路由中心Namesrv设计 Namesrv就是RocketMQ的路由中心,也就是路由元信息的管理中心。主要作用是为消息生产者(Producer)、消费者(Consumer)提供关于主题(Topic)的路由信息,那么,Namesrv需要存储路由的基础信息,还要能管理Broker节点,包括路由注册、路由删除等功能。Namesrv被设计为RocketMQ统一的路由中心,这也就是为何,Producer与Consumer在启动时,统一需要在Namesrv上面注册,而非Broker。
路由元信息 NameServer路由实现类:org.apache.rocketmq.namesrv.routeinfo.RouteInfoManager。
主要属性
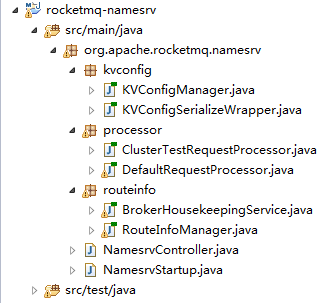
Namesrv实现类一览
Namesrv启动 从Namesrv的启动类NamesrvStartup撸起(文中提到代码均基于RocketMQ 4.5.1版本):org.apache.rocketmq.namesrv.NamesrvStartup.main0(String[])
1
2
3
4
5
6
7
8
9
10
11
12
13
14
public static NamesrvController main0 (String[] args) { try { NamesrvController controller = createNamesrvController(args); start(controller); String tip = "The Name Server boot success. serializeType=" + RemotingCommand.getSerializeTypeConfigInThisServer(); log.info(tip); System.out.printf("%s%n" , tip); return controller; } catch (Throwable e) { e.printStackTrace(); System.exit(-1 ); } return null ; }
整个NameServer的服务启动流程代码都在这个main0(String[] args)方法里了,咋一看,还是比较简单的,大体流程分三步:
创建NamesrvController对象,
启动NamesrvController,
记log并返回NamesrvController对象。步骤三就很简单了,一目了然,那么接下来分析步骤一及步骤二。
创建NamesrvController对象 完整代码:org.apache.rocketmq.namesrv.NamesrvStartup.createNamesrvController(String[])
1
2
3
4
5
6
7
8
9
10
11
12
13
14
15
16
17
18
19
20
21
22
23
24
25
26
27
28
29
30
31
32
33
34
35
36
37
38
39
40
41
42
43
44
45
46
47
48
49
50
51
52
53
54
55
56
57
58
59
60
61
62
63
public static NamesrvController createNamesrvController (String[] args) throws IOException, JoranException { System.setProperty(RemotingCommand.REMOTING_VERSION_KEY, Integer.toString(MQVersion.CURRENT_VERSION)); Options options = ServerUtil.buildCommandlineOptions(new Options ()); commandLine = ServerUtil.parseCmdLine("mqnamesrv" , args, buildCommandlineOptions(options), new PosixParser ()); if (null == commandLine) { System.exit(-1 ); return null ; } final NamesrvConfig namesrvConfig = new NamesrvConfig (); final NettyServerConfig nettyServerConfig = new NettyServerConfig (); nettyServerConfig.setListenPort(9876 ); if (commandLine.hasOption('c' )) { String file = commandLine.getOptionValue('c' ); if (file != null ) { InputStream in = new BufferedInputStream (new FileInputStream (file)); properties = new Properties (); properties.load(in); MixAll.properties2Object(properties, namesrvConfig); MixAll.properties2Object(properties, nettyServerConfig); namesrvConfig.setConfigStorePath(file); System.out.printf("load config properties file OK, %s%n" , file); in.close(); } } if (commandLine.hasOption('p' )) { InternalLogger console = InternalLoggerFactory.getLogger(LoggerName.NAMESRV_CONSOLE_NAME); MixAll.printObjectProperties(console, namesrvConfig); MixAll.printObjectProperties(console, nettyServerConfig); System.exit(0 ); } MixAll.properties2Object(ServerUtil.commandLine2Properties(commandLine), namesrvConfig); if (null == namesrvConfig.getRocketmqHome()) { System.out.printf("Please set the %s variable in your environment to match the location of the RocketMQ installation%n" , MixAll.ROCKETMQ_HOME_ENV); System.exit(-2 ); } LoggerContext lc = (LoggerContext) LoggerFactory.getILoggerFactory(); JoranConfigurator configurator = new JoranConfigurator (); configurator.setContext(lc); lc.reset(); configurator.doConfigure(namesrvConfig.getRocketmqHome() + "/conf/logback_namesrv.xml" ); log = InternalLoggerFactory.getLogger(LoggerName.NAMESRV_LOGGER_NAME); MixAll.printObjectProperties(log, namesrvConfig); MixAll.printObjectProperties(log, nettyServerConfig); final NamesrvController controller = new NamesrvController (namesrvConfig, nettyServerConfig); controller.getConfiguration().registerConfig(properties); return controller; }
这里方法的代码就比较多了,我们拆成几段来撸就比较好分析了:org.apache.rocketmq.namesrv.NamesrvStartup.createNamesrvController(String[])
1
2
3
4
5
6
Options options = ServerUtil.buildCommandlineOptions(new Options ());commandLine = ServerUtil.parseCmdLine("mqnamesrv" , args, buildCommandlineOptions(options), new PosixParser ()); if (null == commandLine) { System.exit(-1 ); return null ; }
这一段是使用了Apache Commons CLI命令行(Command Line Interface)解析工具,它主要是根据运行时传递进来的参数生成commandLine命令行对象,用于解析运行时类似于 -c 指定文件路径,然后填充到 namesrvConfig 和 nettyServerConfig 对象中。
org.apache.rocketmq.namesrv.NamesrvStartup.createNamesrvController(String[])
1
2
3
4
5
6
7
8
9
10
11
12
13
14
15
16
17
18
final NamesrvConfig namesrvConfig = new NamesrvConfig ();final NettyServerConfig nettyServerConfig = new NettyServerConfig ();nettyServerConfig.setListenPort(9876 ); if (commandLine.hasOption('c' )) { String file = commandLine.getOptionValue('c' ); if (file != null ) { InputStream in = new BufferedInputStream (new FileInputStream (file)); properties = new Properties (); properties.load(in); MixAll.properties2Object(properties, namesrvConfig); MixAll.properties2Object(properties, nettyServerConfig); namesrvConfig.setConfigStorePath(file); System.out.printf("load config properties file OK, %s%n" , file); in.close(); } }
这段是createNamesrvController(String[] args)方法最为核心的代码,从代码可以看到,先创建NamesrvConfig和NettyServerConfig对象,接着利用commandLine命令行工具读取-c指定的配置文件路径,然后将其读取到流中,生成properties对象,最后将namesrvConfig和nettyServerConfig对象进行初始化。
这里省略一些没有那么重要的细节代码,譬如支持配置查看模式(命令行添加 -p,则把当前的环境配置输出来)、日志上下文配置(包括日志文件路径设定,Logger获取),这里不细看,接着往下看:
org.apache.rocketmq.namesrv.NamesrvStartup.createNamesrvController(String[])
1
2
3
4
5
6
final NamesrvController controller = new NamesrvController (namesrvConfig, nettyServerConfig);controller.getConfiguration().registerConfig(properties); return controller;
到这里就是水到渠成,利用namesrvConfig和nettyServerConfig对象创建NamesrvController对象,然后在注册一遍properties,防止丢失。
启动NamesrvController 回到 org.apache.rocketmq.namesrv.NamesrvStartup.main0(String[] args) 方法,看进去 start(NamesrvController) 方法org.apache.rocketmq.namesrv.NamesrvStartup.start(NamesrvController)
1
2
3
4
5
6
7
8
9
10
11
12
13
14
15
16
17
18
19
20
21
22
23
24
public static NamesrvController start (final NamesrvController controller) throws Exception { if (null == controller) { throw new IllegalArgumentException ("NamesrvController is null" ); } boolean initResult = controller.initialize(); if (!initResult) { controller.shutdown(); System.exit(-3 ); } Runtime.getRuntime().addShutdownHook(new ShutdownHookThread (log, new Callable <Void>() { @Override public Void call () throws Exception { controller.shutdown(); return null ; } })); controller.start(); return controller; }
这个方法主要是对核心控制器进行初始化操作,其次是注册一个钩子函数,用于JVM进程关闭时,优雅地释放netty服务、线程池等资源,最后对核心控制器进行启动操作,接下来我们继续撸org.apache.rocketmq.namesrv.NamesrvController.initialize() 详细实现:org.apache.rocketmq.namesrv.NamesrvController.initialize()
1
2
3
4
5
6
7
8
9
10
11
12
13
14
15
16
17
18
19
20
21
22
23
24
25
26
27
28
29
30
31
32
33
public boolean initialize () { this .kvConfigManager.load(); this .remotingServer = new NettyRemotingServer (this .nettyServerConfig, this .brokerHousekeepingService); this .remotingExecutor = Executors.newFixedThreadPool(nettyServerConfig.getServerWorkerThreads(), new ThreadFactoryImpl ("RemotingExecutorThread_" )); this .registerProcessor(); this .scheduledExecutorService.scheduleAtFixedRate(new Runnable () { @Override public void run () { NamesrvController.this .routeInfoManager.scanNotActiveBroker(); } }, 5 , 10 , TimeUnit.SECONDS); this .scheduledExecutorService.scheduleAtFixedRate(new Runnable () { @Override public void run () { NamesrvController.this .kvConfigManager.printAllPeriodically(); } }, 1 , 10 , TimeUnit.MINUTES); return true ; }
至此,就是最后一步了,就是创建Netty服务来进行通信,关于Netty的实现细节较多,这里不深入,要想了解可以看一下Netty相关文章。
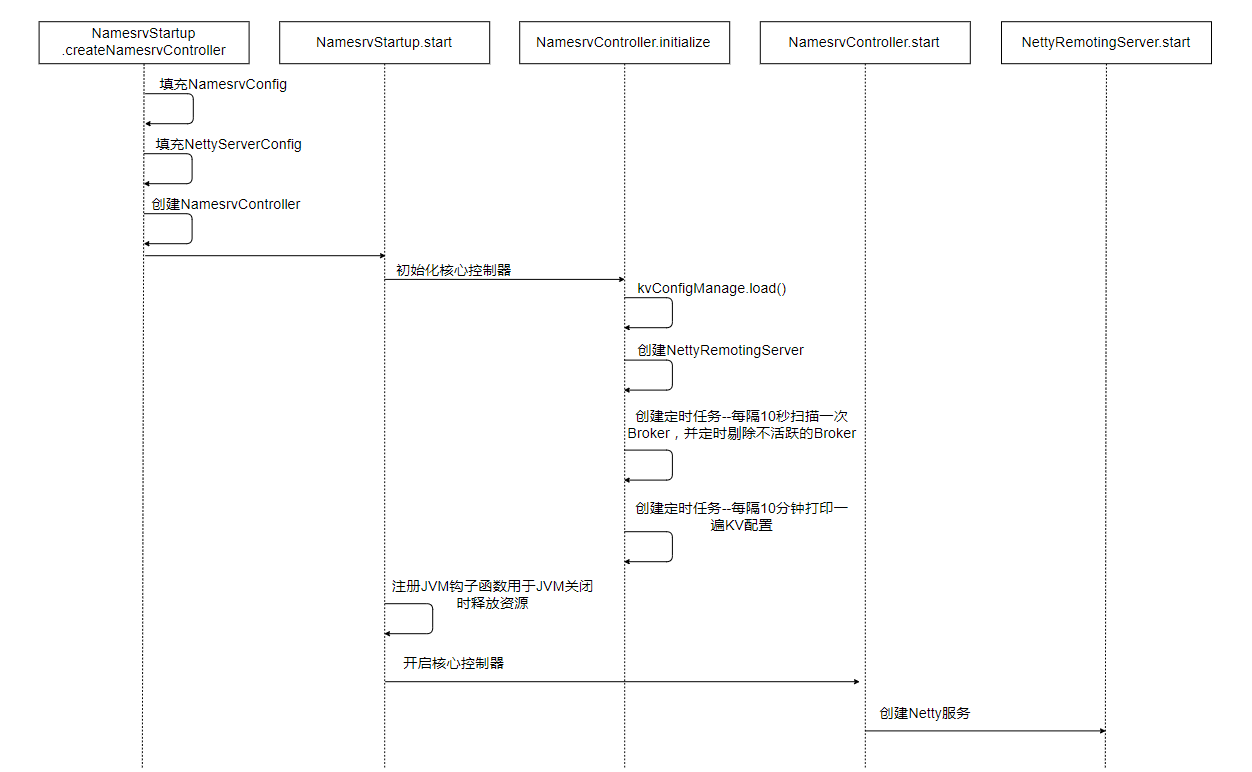
路由启动时序图
路由注册 路由注册即是Broker向Nameserver注册的过程,它们是通过Broker的心跳功能实现的,既然Nameserver是用来存储Broker的注册信息,那么我们就先来看看Nameserver到底存储了哪些信息,就是上文那张结构图,我们知道RouteInfoManager为路由信息表。
RocketMQ是基于订阅发布机制的,一个Topic拥有多个消息队列,如果不指定队列的数量,一个Broker默认会为每个Topic创建4个读队列和4个写队列,多个Broker组成集群,Broker会通过发送心跳包将自己的信息注册到路由中心,路由中心brokerLiveTable存储Broker的状态,它会根据Broker的心跳包更新Broker状态信息。
Broker发送心跳包 org.apache.rocketmq.broker.BrokerController.start()
1
2
3
4
5
6
7
8
9
10
11
12
13
this .registerBrokerAll(true , false , true ); this .scheduledExecutorService.scheduleAtFixedRate(new Runnable () { @Override public void run () { try { BrokerController.this .registerBrokerAll(true , false , brokerConfig.isForceRegister()); } catch (Throwable e) { log.error("registerBrokerAll Exception" , e); } } }, 1000 * 10 , Math.max(10000 , Math.min(brokerConfig.getRegisterNameServerPeriod(), 60000 )), TimeUnit.MILLISECONDS);
Broker在核心控制器启动时,会强制发送一次心跳包,接着创建一个定时任务,定时向路由中心发送心跳包。由 brokerConfig.getRegisterNameServerPeriod() 可以看到这个定时时间支持可配置,但是调了两个Math类的限制大小函数,把时间限定在[10,60]这个区间,默认是30秒。org.apache.rocketmq.broker.BrokerController.registerBrokerAll(boolean, boolean, boolean)
1
2
3
4
5
6
7
8
9
10
11
12
13
14
15
16
17
18
19
20
21
22
23
public synchronized void registerBrokerAll (final boolean checkOrderConfig, boolean oneway, boolean forceRegister) { TopicConfigSerializeWrapper topicConfigWrapper = this .getTopicConfigManager().buildTopicConfigSerializeWrapper(); if (!PermName.isWriteable(this .getBrokerConfig().getBrokerPermission()) || !PermName.isReadable(this .getBrokerConfig().getBrokerPermission())) { ConcurrentHashMap<String, TopicConfig> topicConfigTable = new ConcurrentHashMap <String, TopicConfig>(); for (TopicConfig topicConfig : topicConfigWrapper.getTopicConfigTable().values()) { TopicConfig tmp = new TopicConfig (topicConfig.getTopicName(), topicConfig.getReadQueueNums(), topicConfig.getWriteQueueNums(), this .brokerConfig.getBrokerPermission()); topicConfigTable.put(topicConfig.getTopicName(), tmp); } topicConfigWrapper.setTopicConfigTable(topicConfigTable); } if (forceRegister || needRegister(this .brokerConfig.getBrokerClusterName(), this .getBrokerAddr(), this .brokerConfig.getBrokerName(), this .brokerConfig.getBrokerId(), this .brokerConfig.getRegisterBrokerTimeoutMills())) { doRegisterBrokerAll(checkOrderConfig, oneway, topicConfigWrapper); } }
该方法是Broker执行发送心跳包的核心控制方法,它主要做了topic的包装类封装操作,判断Broker此时是否需要执行发送心跳包,但查看org.apache.rocketmq.common.BrokerConfig#forceRegister字段的值,发现写死为true,也就是该判断永远为true,即默认配置下是每次都需要发送心跳包。 org.apache.rocketmq.broker.BrokerController.needRegister(String, String, String, long, int)
1
2
3
4
5
6
7
8
9
10
11
12
13
14
15
16
17
private boolean needRegister (final String clusterName, final String brokerAddr, final String brokerName, final long brokerId, final int timeoutMills) { TopicConfigSerializeWrapper topicConfigWrapper = this .getTopicConfigManager().buildTopicConfigSerializeWrapper(); List<Boolean> changeList = brokerOuterAPI.needRegister(clusterName, brokerAddr, brokerName, brokerId, topicConfigWrapper, timeoutMills); boolean needRegister = false ; for (Boolean changed : changeList) { if (changed) { needRegister = true ; break ; } } return needRegister; }
进去里边发现,是否需要发送心跳包的逻辑还得结合 org.apache.rocketmq.broker.out.BrokerOuterAPI.needRegister(String, String, String, long, TopicConfigSerializeWrapper, int) 方法来判断。org.apache.rocketmq.broker.out.BrokerOuterAPI.needRegister(String, String, String, long, TopicConfigSerializeWrapper, int)
1
2
3
4
5
6
7
8
9
10
11
12
13
14
15
16
17
18
19
20
21
22
23
24
25
26
27
28
29
30
31
32
33
34
35
36
37
38
39
40
41
42
43
44
45
46
47
48
49
50
51
52
53
54
55
56
57
58
59
60
61
62
63
64
public List<Boolean> needRegister ( final String clusterName, final String brokerAddr, final String brokerName, final long brokerId, final TopicConfigSerializeWrapper topicConfigWrapper, final int timeoutMills) { final List<Boolean> changedList = new CopyOnWriteArrayList <>(); List<String> nameServerAddressList = this .remotingClient.getNameServerAddressList(); if (nameServerAddressList != null && nameServerAddressList.size() > 0 ) { final CountDownLatch countDownLatch = new CountDownLatch (nameServerAddressList.size()); for (final String namesrvAddr : nameServerAddressList) { brokerOuterExecutor.execute(new Runnable () { @Override public void run () { try { QueryDataVersionRequestHeader requestHeader = new QueryDataVersionRequestHeader (); requestHeader.setBrokerAddr(brokerAddr); requestHeader.setBrokerId(brokerId); requestHeader.setBrokerName(brokerName); requestHeader.setClusterName(clusterName); RemotingCommand request = RemotingCommand.createRequestCommand(RequestCode.QUERY_DATA_VERSION, requestHeader); request.setBody(topicConfigWrapper.getDataVersion().encode()); RemotingCommand response = remotingClient.invokeSync(namesrvAddr, request, timeoutMills); DataVersion nameServerDataVersion = null ; Boolean changed = false ; switch (response.getCode()) { case ResponseCode.SUCCESS: { QueryDataVersionResponseHeader queryDataVersionResponseHeader = (QueryDataVersionResponseHeader) response.decodeCommandCustomHeader(QueryDataVersionResponseHeader.class); changed = queryDataVersionResponseHeader.getChanged(); byte [] body = response.getBody(); if (body != null ) { nameServerDataVersion = DataVersion.decode(body, DataVersion.class); if (!topicConfigWrapper.getDataVersion().equals(nameServerDataVersion)) { changed = true ; } } if (changed == null || changed) { changedList.add(Boolean.TRUE); } } default : break ; } log.warn("Query data version from name server {} OK,changed {}, broker {},name server {}" , namesrvAddr, changed, topicConfigWrapper.getDataVersion(), nameServerDataVersion == null ? "" : nameServerDataVersion); } catch (Exception e) { changedList.add(Boolean.TRUE); log.error("Query data version from name server {} Exception, {}" , namesrvAddr, e); } finally { countDownLatch.countDown(); } } }); } try { countDownLatch.await(timeoutMills, TimeUnit.MILLISECONDS); } catch (InterruptedException e) { log.error("query dataversion from nameserver countDownLatch await Exception" , e); } } return changedList; }
捋一捋这个方法的逻辑,发现,关键是这个判断 !topicConfigWrapper.getDataVersion().equals(nameServerDataVersion),就是说,该Broker本地的topic配置的DataVersion与远程调用Namesrv获取回来的DataVersion是否一致,如果不是,则要发送心跳包。
我们再定位到 needRegister 远程调用到路由中心Namesrv的方法:
org.apache.rocketmq.namesrv.routeinfo.RouteInfoManager.isBrokerTopicConfigChanged(String, DataVersion), org.apache.rocketmq.namesrv.routeinfo.RouteInfoManager.queryBrokerTopicConfig(String)
1
2
3
4
5
6
7
8
9
10
11
12
public boolean isBrokerTopicConfigChanged (final String brokerAddr, final DataVersion dataVersion) { DataVersion prev = queryBrokerTopicConfig(brokerAddr); return null == prev || !prev.equals(dataVersion); } public DataVersion queryBrokerTopicConfig (final String brokerAddr) { BrokerLiveInfo prev = this .brokerLiveTable.get(brokerAddr); if (prev != null ) { return prev.getDataVersion(); } return null ; }
发现,关键还是取决于Namesrv这边记录的存活Broker列表BrokerLiveInfo中的dataVersion,如果broker本地存的dataVersion为空或者当前这个dataVersion不等于NameServ的brokerLiveTable里存储的brokerLiveInfo里边的dataVersion,就说明Broker信息版本与NameServ的对不上号,则需要更新,也就是说Broker就需要发送心跳包。
NameSrv处理心跳包 Nameserver的netty服务监听收到心跳包之后,会调用到路由中心以下方法进行处理:org.apache.rocketmq.namesrv.routeinfo.RouteInfoManager.registerBroker(String, String, String, long, String, TopicConfigSerializeWrapper, List, Channel)
1
2
3
4
5
6
7
8
9
10
11
12
13
14
15
16
17
18
19
20
21
22
23
24
25
26
27
28
29
30
31
32
33
34
35
36
37
38
39
40
41
42
43
44
45
46
47
48
49
50
51
52
53
54
55
56
57
58
59
60
61
62
63
64
65
66
67
68
69
70
71
72
73
74
75
76
77
78
79
80
81
82
83
84
85
86
87
88
89
90
91
92
93
94
public RegisterBrokerResult registerBroker ( final String clusterName, final String brokerAddr, final String brokerName, final long brokerId, final String haServerAddr, final TopicConfigSerializeWrapper topicConfigWrapper, final List<String> filterServerList, final Channel channel) { RegisterBrokerResult result = new RegisterBrokerResult (); try { try { this .lock.writeLock().lockInterruptibly(); Set<String> brokerNames = this .clusterAddrTable.get(clusterName); if (null == brokerNames) { brokerNames = new HashSet <String>(); this .clusterAddrTable.put(clusterName, brokerNames); } brokerNames.add(brokerName); boolean registerFirst = false ; BrokerData brokerData = this .brokerAddrTable.get(brokerName); if (null == brokerData) { registerFirst = true ; brokerData = new BrokerData (clusterName, brokerName, new HashMap <Long, String>()); this .brokerAddrTable.put(brokerName, brokerData); } Map<Long, String> brokerAddrsMap = brokerData.getBrokerAddrs(); Iterator<Entry<Long, String>> it = brokerAddrsMap.entrySet().iterator(); while (it.hasNext()) { Entry<Long, String> item = it.next(); if (null != brokerAddr && brokerAddr.equals(item.getValue()) && brokerId != item.getKey()) { it.remove(); } } String oldAddr = brokerData.getBrokerAddrs().put(brokerId, brokerAddr); registerFirst = registerFirst || (null == oldAddr); if (null != topicConfigWrapper && MixAll.MASTER_ID == brokerId) { if (this .isBrokerTopicConfigChanged(brokerAddr, topicConfigWrapper.getDataVersion()) || registerFirst) { ConcurrentMap<String, TopicConfig> tcTable = topicConfigWrapper.getTopicConfigTable(); if (tcTable != null ) { for (Map.Entry<String, TopicConfig> entry : tcTable.entrySet()) { this .createAndUpdateQueueData(brokerName, entry.getValue()); } } } } BrokerLiveInfo prevBrokerLiveInfo = this .brokerLiveTable.put(brokerAddr, new BrokerLiveInfo ( System.currentTimeMillis(), topicConfigWrapper.getDataVersion(), channel, haServerAddr)); if (null == prevBrokerLiveInfo) { log.info("new broker registered, {} HAServer: {}" , brokerAddr, haServerAddr); } if (filterServerList != null ) { if (filterServerList.isEmpty()) { this .filterServerTable.remove(brokerAddr); } else { this .filterServerTable.put(brokerAddr, filterServerList); } } if (MixAll.MASTER_ID != brokerId) { String masterAddr = brokerData.getBrokerAddrs().get(MixAll.MASTER_ID); if (masterAddr != null ) { BrokerLiveInfo brokerLiveInfo = this .brokerLiveTable.get(masterAddr); if (brokerLiveInfo != null ) { result.setHaServerAddr(brokerLiveInfo.getHaServerAddr()); result.setMasterAddr(masterAddr); } } } } finally { this .lock.writeLock().unlock(); } } catch (Exception e) { log.error("registerBroker Exception" , e); } return result; }
该方法是处理Broker心跳包的最核心方法,它主要做了对RouteInfoManager路由信息的一些更新操作,包括对clusterAddrTable、brokerAddrTable、topicQueueTable、brokerLiveTable等路由信息。
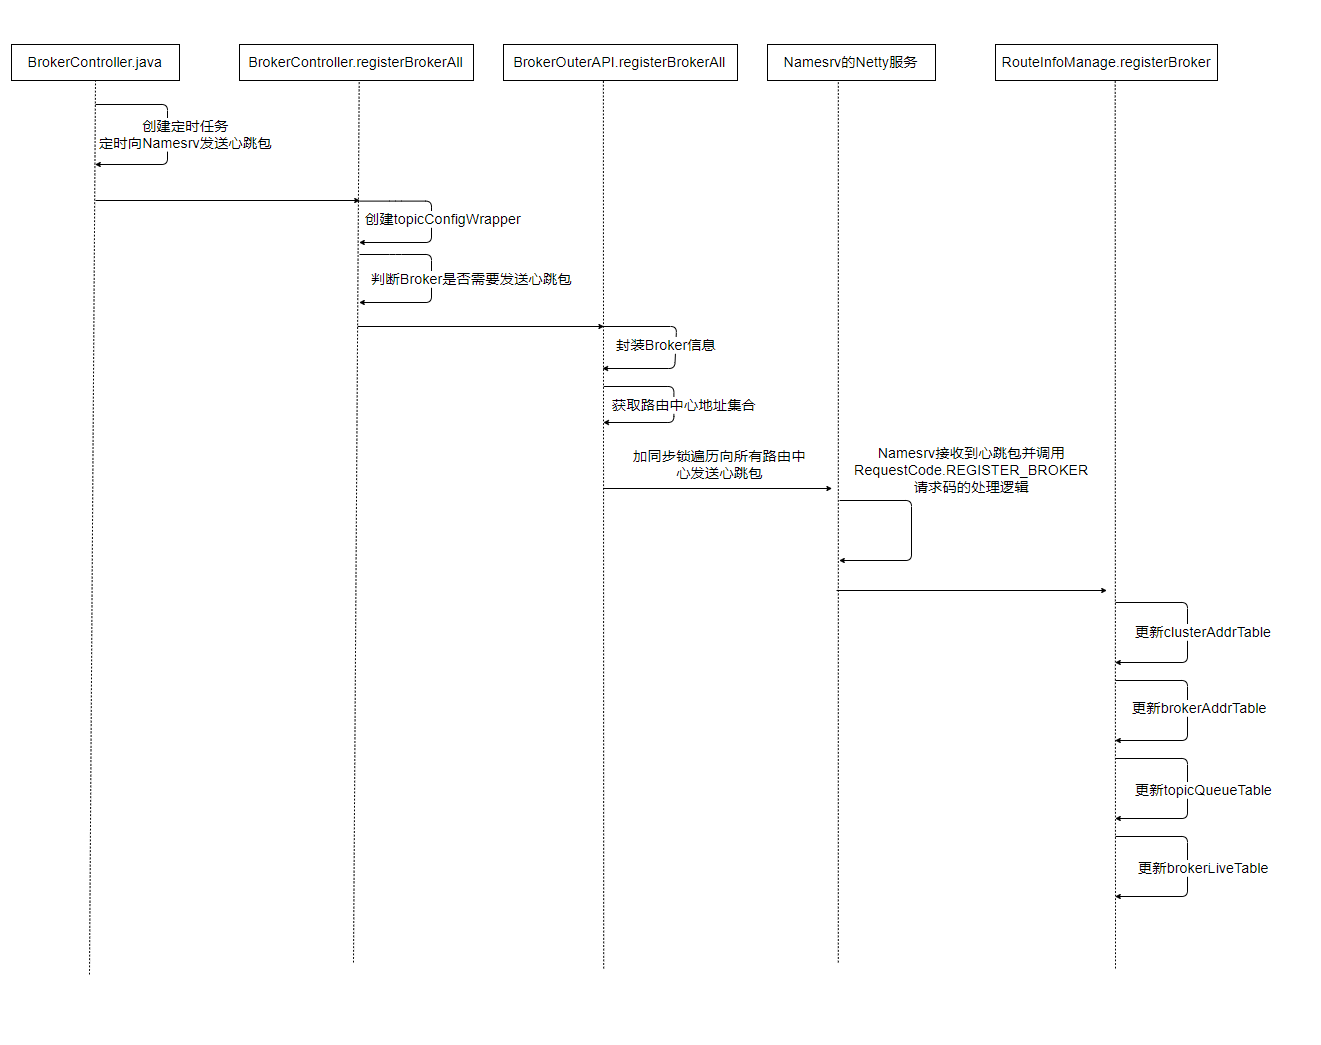
Broker路由注册时序图
路由删除 前面部分我们分析了Nameserver启动时会创建一个定时任务,定时剔除不活跃的Broker。org.apache.rocketmq.namesrv.routeinfo.RouteInfoManager.scanNotActiveBroker()
1
2
3
4
5
6
7
8
9
10
11
12
13
public void scanNotActiveBroker () { Iterator<Entry<String, BrokerLiveInfo>> it = this .brokerLiveTable.entrySet().iterator(); while (it.hasNext()) { Entry<String, BrokerLiveInfo> next = it.next(); long last = next.getValue().getLastUpdateTimestamp(); if ((last + BROKER_CHANNEL_EXPIRED_TIME) < System.currentTimeMillis()) { RemotingUtil.closeChannel(next.getValue().getChannel()); it.remove(); log.warn("The broker channel expired, {} {}ms" , next.getKey(), BROKER_CHANNEL_EXPIRED_TIME); this .onChannelDestroy(next.getKey(), next.getValue().getChannel()); } } }
剔除Broker信息的逻辑就比较简单了,就是遍历所有存活的Broker的信息,也就是BrokerLiveInfo,从BrokerLiveInfo获取状态信息,判断Broker的心跳时间是否已经超过限定值,如果超过,则执行剔除的逻辑。
路由发现 RocketMQ路由发现,是非实时的。当Topic路由出现变化后,Namesrv不主动推送给客户端,而是由客户端定时拉取主题最新的路由。
• String orderTopicConf :顺序消息配置内容,来自于kvConfig 。
NameServer 路由发现实现方法:org.apache.rocketmq.namesrv.processor.DefaultRequestProcessor.getRouteInfoByTopic(ChannelHandlerContext, RemotingCommand)
1
2
3
4
5
6
7
8
9
10
11
12
13
14
15
16
17
18
19
20
21
22
23
24
25
26
27
28
public RemotingCommand getRouteInfoByTopic (ChannelHandlerContext ctx, RemotingCommand request) throws RemotingCommandException { final RemotingCommand response = RemotingCommand.createResponseCommand(null ); final GetRouteInfoRequestHeader requestHeader = (GetRouteInfoRequestHeader) request.decodeCommandCustomHeader(GetRouteInfoRequestHeader.class); TopicRouteData topicRouteData = this .namesrvController.getRouteInfoManager().pickupTopicRouteData(requestHeader.getTopic()); if (topicRouteData != null ) { if (this .namesrvController.getNamesrvConfig().isOrderMessageEnable()) { String orderTopicConf = this .namesrvController.getKvConfigManager().getKVConfig(NamesrvUtil.NAMESPACE_ORDER_TOPIC_CONFIG, requestHeader.getTopic()); topicRouteData.setOrderTopicConf(orderTopicConf); } byte [] content = topicRouteData.encode(); response.setBody(content); response.setCode(ResponseCode.SUCCESS); response.setRemark(null ); return response; } response.setCode(ResponseCode.TOPIC_NOT_EXIST); response.setRemark("No topic route info in name server for the topic: " + requestHeader.getTopic() + FAQUrl.suggestTodo(FAQUrl.APPLY_TOPIC_URL)); return response; }
Step 1:调用RouterlnfoManager 的方法,从路由表topicQueueTable 、brokerAddrTable 、filterServerTable 中分别填充TopicRouteData 中的List<QueueData>、List<BrokerData>和 filterServer 地址表。
小结 本文主要介绍了NameServer 路由功能,包含路由元数据、路由注册与发现机制。
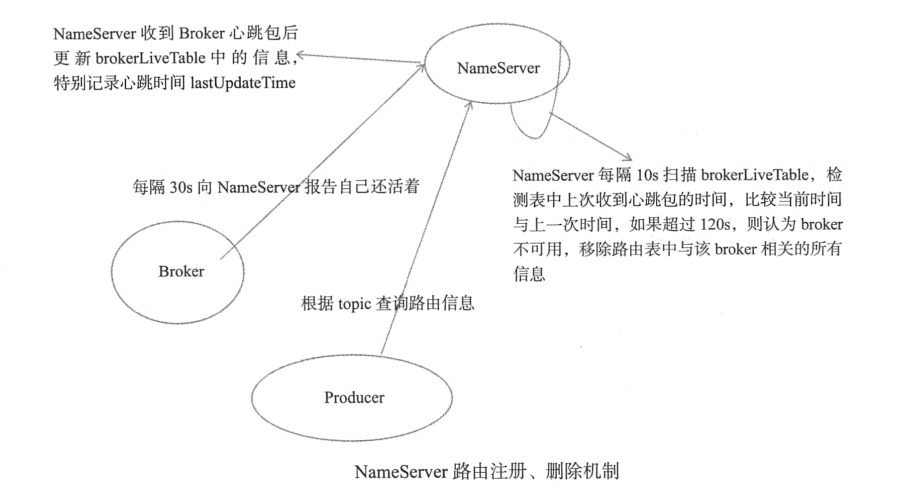
Namesrv路由发现与删除机制的设计,主要是,消息生产者(Producer)在发送消息之前先从Namesrv获取Broker服务器地址列表,然后根据负载算法从列表中选择一台消息服务器进行发送 。Namesrv与每台Broker服务器保持长连接,Broker每隔30秒(可配置,默认30秒)发送一次心跳向Namesrv报告自己存活,而Namesrv则间隔10秒检测一次Broker是否存活(对比上一次报告时间是否超过120秒),如果检测到Broker宕机,则从路由注册表(BrokerLiveInfo)中将其移除。消息发送端提供容错机制来保证消息的高可用性的 , 这样的设计,主要是为了降低Namesrv实现的复杂性。