RocketMQ发送消息主流程 RocketMQ发送消息主要流程:
RocketMQ消息发送方式 RocketMQ支持3种消息发送方式:同步(Sync)、异步(Async)、单向(Oneway)。
同步:发送者向MQ 执行发送消息API 时,同步等待, 直到消息服务器返回发送结果。
异步:发送者向MQ 执行发送消息API 时,指定消息发送成功后的回调函数,然后调用消息发送API 后,立即返回,消息发送者线程不阻塞,直到运行结束。待消息发送成功或失败的时候,回调任务在一个新的线程中执行。
RocketMQ 消息发送考虑的问题
消息队列如何负载?
消息发送如何实现高可用?
批量消息发送如何实现一致性?
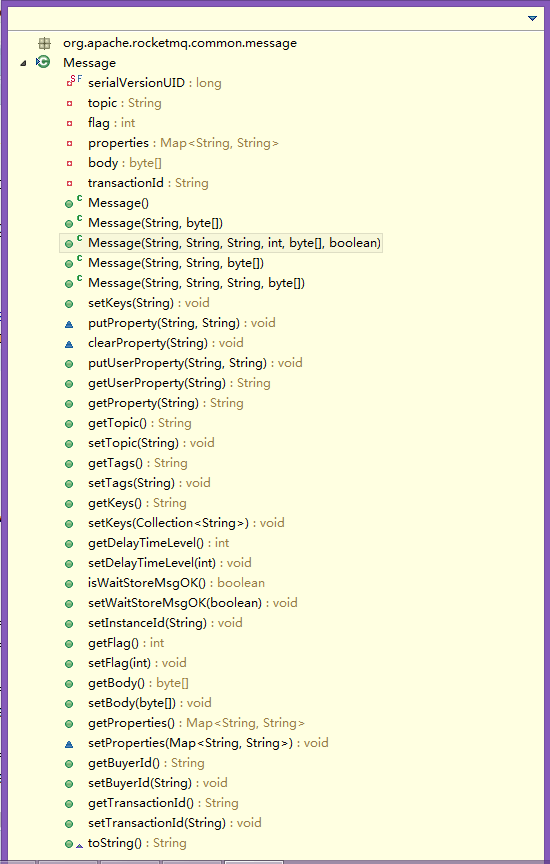
RocketMQ消息结构 RocketMQ 消息封装类是 org.apache.rocketmq.common.message.Message ,其类设计如下
Message类的全属性构造函数org.apache.rocketmq.common.message.Message.Message(String, String, String, int, byte[], boolean)
1
2
3
4
5
6
7
8
9
10
11
12
13
public Message (String topic, String tags, String keys, int flag, byte [] body, boolean waitStoreMsgOK) { this .topic = topic; this .flag = flag; this .body = body; if (tags != null && tags.length() > 0 ) this .setTags(tags); if (keys != null && keys.length() > 0 ) this .setKeys(keys); this .setWaitStoreMsgOK(waitStoreMsgOK); }
Message 的基础属性主要包括消息所属主题topic , 消息Flag(RocketMQ 不做处理)、扩展属性(properties)、消息体(body)、事务ID(transactionId,用于分布式事务)。
其中,RocketMQ Message的一些扩展属性properties还包含:
delayTimeLevel:消息延迟级别,用于定时消息或消息重试
buyerId: 买家ID(这个字段一看就带有很浓重的电商气息)
透过这些属性的set方法可以知道,这些扩展属性存储在Message的Map类型的properties变量中。
生产者的启动流程 消息生产者的代码都在client 模块中,相对于RocketMQ 来说,它就是客户端,也是消息的提供者,我们在应用系统中初始化生产者的一个实例即可使用它来发消息。
DefaultMQProducer(默认的消息发送者) 消息生产者的启动流程,我们可以从org.apache.rocketmq.client.producer.DefaultMQProducer.start()入口开始看进去,org.apache.rocketmq.client.impl.producer.DefaultMQProducerImpl.start(boolean)
1 2 3 4 5 6 7 8 9 10 11 12 13 14 15 16 17 18 19 20 21 22 23 24 25 26 27 28 29 30 31 32 33 34 35 36 37 38 39 40 41 42 43 44 45 46 47 48 49 public void start () throws MQClientException { this .start(true ); } public void start (final boolean startFactory) throws MQClientException { switch (this .serviceState) { case CREATE_JUST: this .serviceState = ServiceState.START_FAILED; this .checkConfig(); if (!this .defaultMQProducer.getProducerGroup().equals(MixAll.CLIENT_INNER_PRODUCER_GROUP)) { this .defaultMQProducer.changeInstanceNameToPID(); } this .mQClientFactory = MQClientManager.getInstance().getAndCreateMQClientInstance(this .defaultMQProducer, rpcHook); boolean registerOK = mQClientFactory.registerProducer(this .defaultMQProducer.getProducerGroup(), this ); if (!registerOK) { this .serviceState = ServiceState.CREATE_JUST; throw new MQClientException ("The producer group[" + this .defaultMQProducer.getProducerGroup() + "] has been created before, specify another name please." + FAQUrl.suggestTodo(FAQUrl.GROUP_NAME_DUPLICATE_URL), null ); } this .topicPublishInfoTable.put(this .defaultMQProducer.getCreateTopicKey(), new TopicPublishInfo ()); if (startFactory) { mQClientFactory.start(); } log.info("the producer [{}] start OK. sendMessageWithVIPChannel={}" , this .defaultMQProducer.getProducerGroup(), this .defaultMQProducer.isSendMessageWithVIPChannel()); this .serviceState = ServiceState.RUNNING; break ; case RUNNING: case START_FAILED: case SHUTDOWN_ALREADY: throw new MQClientException ("The producer service state not OK, maybe started once, " + this .serviceState + FAQUrl.suggestTodo(FAQUrl.CLIENT_SERVICE_NOT_OK), null ); default : break ; } this .mQClientFactory.sendHeartbeatToAllBrokerWithLock(); }
接下来,重点看一下MQClientManager.getInstance().getAndCreateMQClientInstance(this.defaultMQProducer, rpcHook) 的操作
1 2 3 4 5 6 7 8 9 10 11 12 13 14 15 16 17 18 19 public MQClientInstance getAndCreateMQClientInstance (final ClientConfig clientConfig, RPCHook rpcHook) { String clientId = clientConfig.buildMQClientId(); MQClientInstance instance = this .factoryTable.get(clientId); if (null == instance) { instance = new MQClientInstance (clientConfig.cloneClientConfig(), this .factoryIndexGenerator.getAndIncrement(), clientId, rpcHook); MQClientInstance prev = this .factoryTable.putIfAbsent(clientId, instance); if (prev != null ) { instance = prev; log.warn("Returned Previous MQClientInstance for clientId:[{}]" , clientId); } else { log.info("Created new MQClientInstance for clientId:[{}]" , clientId); } } return instance; }
继续跟进去看初始化MQClientInstance的构造,最终的操作都会围绕该类进行操作和整合
1 2 3 4 5 6 7 8 9 10 11 12 13 14 15 16 17 18 19 20 21 22 23 24 25 26 27 28 29 30 31 32 33 34 public MQClientInstance (ClientConfig clientConfig, int instanceIndex, String clientId, RPCHook rpcHook) { this .clientConfig = clientConfig; this .instanceIndex = instanceIndex; this .nettyClientConfig = new NettyClientConfig (); this .nettyClientConfig.setClientCallbackExecutorThreads(clientConfig.getClientCallbackExecutorThreads()); this .nettyClientConfig.setUseTLS(clientConfig.isUseTLS()); this .clientRemotingProcessor = new ClientRemotingProcessor (this ); this .mQClientAPIImpl = new MQClientAPIImpl (this .nettyClientConfig, this .clientRemotingProcessor, rpcHook, clientConfig); if (this .clientConfig.getNamesrvAddr() != null ) { this .mQClientAPIImpl.updateNameServerAddressList(this .clientConfig.getNamesrvAddr()); log.info("user specified name server address: {}" , this .clientConfig.getNamesrvAddr()); } this .clientId = clientId; this .mQAdminImpl = new MQAdminImpl (this ); this .pullMessageService = new PullMessageService (this ); this .rebalanceService = new RebalanceService (this ); this .defaultMQProducer = new DefaultMQProducer (MixAll.CLIENT_INNER_PRODUCER_GROUP); this .defaultMQProducer.resetClientConfig(clientConfig); this .consumerStatsManager = new ConsumerStatsManager (this .scheduledExecutorService); log.info("Created a new client Instance, InstanceIndex:{}, ClientID:{}, ClientConfig:{}, ClientVersion:{}, SerializerType:{}" , this .instanceIndex, this .clientId, this .clientConfig, MQVersion.getVersionDesc(MQVersion.CURRENT_VERSION), RemotingCommand.getSerializeTypeConfigInThisServer()); }
继续跟进去网络通信的构造方法 org.apache.rocketmq.client.impl.MQClientAPIImpl.MQClientAPIImpl(NettyClientConfig, ClientRemotingProcessor, RPCHook, ClientConfig)
1 2 3 4 5 6 7 8 9 10 11 12 13 14 15 16 17 18 19 20 21 22 public MQClientAPIImpl (final NettyClientConfig nettyClientConfig, final ClientRemotingProcessor clientRemotingProcessor, RPCHook rpcHook, final ClientConfig clientConfig) { this .clientConfig = clientConfig; topAddressing = new TopAddressing (MixAll.getWSAddr(), clientConfig.getUnitName()); this .remotingClient = new NettyRemotingClient (nettyClientConfig, null ); this .clientRemotingProcessor = clientRemotingProcessor; this .remotingClient.registerRPCHook(rpcHook); this .remotingClient.registerProcessor(RequestCode.CHECK_TRANSACTION_STATE, this .clientRemotingProcessor, null ); this .remotingClient.registerProcessor(RequestCode.NOTIFY_CONSUMER_IDS_CHANGED, this .clientRemotingProcessor, null ); this .remotingClient.registerProcessor(RequestCode.RESET_CONSUMER_CLIENT_OFFSET, this .clientRemotingProcessor, null ); this .remotingClient.registerProcessor(RequestCode.GET_CONSUMER_STATUS_FROM_CLIENT, this .clientRemotingProcessor, null ); this .remotingClient.registerProcessor(RequestCode.GET_CONSUMER_RUNNING_INFO, this .clientRemotingProcessor, null ); this .remotingClient.registerProcessor(RequestCode.CONSUME_MESSAGE_DIRECTLY, this .clientRemotingProcessor, null ); }
至此,初始化配置的操作已经完成。接下来,就是继续调用mqClientFactory.start()方法,org.apache.rocketmq.client.impl.factory.MQClientInstance.start()
1
2
3
4
5
6
7
8
9
10
11
12
13
14
15
16
17
18
19
20
21
22
23
24
25
26
27
28
29
30
31
32
33
34
public void start () throws MQClientException { synchronized (this ) { switch (this .serviceState) { case CREATE_JUST: this .serviceState = ServiceState.START_FAILED; if (null == this .clientConfig.getNamesrvAddr()) { this .mQClientAPIImpl.fetchNameServerAddr(); } this .mQClientAPIImpl.start(); this .startScheduledTask(); this .pullMessageService.start(); this .rebalanceService.start(); this .defaultMQProducer.getDefaultMQProducerImpl().start(false ); log.info("the client factory [{}] start OK" , this .clientId); this .serviceState = ServiceState.RUNNING; break ; case RUNNING: break ; case SHUTDOWN_ALREADY: break ; case START_FAILED: throw new MQClientException ("The Factory object[" + this .getClientId() + "] has been created before, and failed." , null ); default : break ; } } }
以上,就是producer(消息发送端)的启动操作过程。接下来,就是重头——消息发送过程。
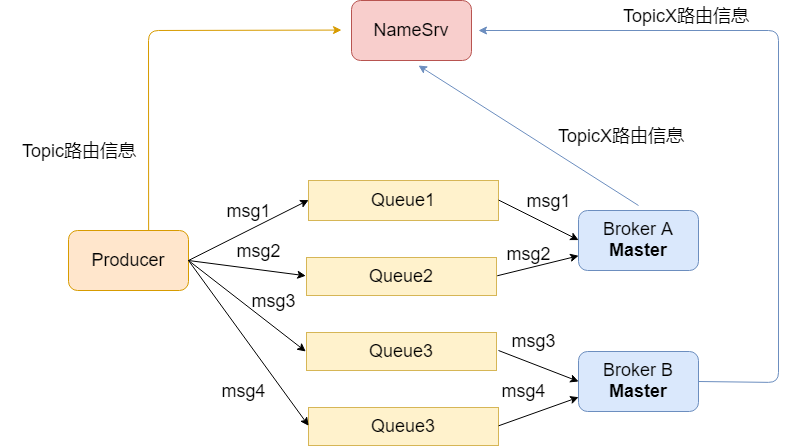
RocketMQ消息发送流程剖析 Broker在启动后会周期性地向NameSrv注册自身及Topic路由信息,而生产者Producer同样会周期性地从NameSrv上拉取最新更新至本地的Topic路由信息。当Producer要开始发送某一Topic的消息时,便会从本地的路由表中找到Topic对应的路由,选择Topic下合适的Broker来发送消息。RocketMQ中,Topic底下包含若干个队列(Queue),也就是说,Topic对Queue是一对多的关系。每个Queue都记录了自己所属的Broker,对于同一个Topic而言,它的多个Queue可能指向同一个Broker。
如上文所述,Producer根据消息的Topic,选出对应的路由信息(TopicRouteData),再挑选出具体某个MessageQueue,将消息发送至MessageQueue对应的Broker。
假设TopicX上有4个Queue(queue1,queue2,queue3,queue4),那么Producer发送TopicX的消息时,会将消息平均发送到每个Queue,从而发送到每个Queue对应的Broker,至于Broker这边,仅Master节点才能接收Producer发来的消息并写入到本地存储,如果有Slave,则会再从Master同步至Slave。
接下来是发送消息的源码分析环节。
消息发送的流程解析 消息发送的主要步骤包括:验证消息、查找路由、消息发送(包含异常处理机制)。
直接来看发送消息的默认实现,org.apache.rocketmq.client.impl.producer.DefaultMQProducerImpl.sendDefaultImpl(Message, CommunicationMode, SendCallback, long)
1
2
3
4
5
6
7
8
9
10
11
12
13
14
15
16
17
18
19
20
21
22
23
24
25
26
27
28
29
30
31
32
33
34
35
36
37
38
39
40
41
42
43
44
45
46
47
48
49
50
51
52
53
54
55
56
57
58
59
60
61
62
63
64
65
66
67
68
69
70
71
72
73
74
75
76
77
78
79
80
81
82
83
84
85
86
87
88
89
90
91
92
93
94
95
96
97
98
99
100
101
102
103
104
105
106
107
108
109
110
111
112
113
114
115
116
117
118
119
120
121
122
123
124
125
126
127
128
129
130
131
132
133
134
135
136
137
138
139
140
141
142
143
144
145
146
147
148
private SendResult sendDefaultImpl ( Message msg, final CommunicationMode communicationMode, final SendCallback sendCallback, final long timeout ) throws MQClientException, RemotingException, MQBrokerException, InterruptedException { this .makeSureStateOK(); Validators.checkMessage(msg, this .defaultMQProducer); final long invokeID = random.nextLong(); long beginTimestampFirst = System.currentTimeMillis(); long beginTimestampPrev = beginTimestampFirst; long endTimestamp = beginTimestampFirst; TopicPublishInfo topicPublishInfo = this .tryToFindTopicPublishInfo(msg.getTopic()); if (topicPublishInfo != null && topicPublishInfo.ok()) { boolean callTimeout = false ; MessageQueue mq = null ; Exception exception = null ; SendResult sendResult = null ; int timesTotal = communicationMode == CommunicationMode.SYNC ? 1 + this .defaultMQProducer.getRetryTimesWhenSendFailed() : 1 ; int times = 0 ; String[] brokersSent = new String [timesTotal]; for (; times < timesTotal; times++) { String lastBrokerName = null == mq ? null : mq.getBrokerName(); MessageQueue mqSelected = this .selectOneMessageQueue(topicPublishInfo, lastBrokerName); if (mqSelected != null ) { mq = mqSelected; brokersSent[times] = mq.getBrokerName(); try { beginTimestampPrev = System.currentTimeMillis(); if (times > 0 ) { msg.setTopic(this .defaultMQProducer.withNamespace(msg.getTopic())); } long costTime = beginTimestampPrev - beginTimestampFirst; if (timeout < costTime) { callTimeout = true ; break ; } sendResult = this .sendKernelImpl(msg, mq, communicationMode, sendCallback, topicPublishInfo, timeout - costTime); endTimestamp = System.currentTimeMillis(); this .updateFaultItem(mq.getBrokerName(), endTimestamp - beginTimestampPrev, false ); switch (communicationMode) { case ASYNC: return null ; case ONEWAY: return null ; case SYNC: if (sendResult.getSendStatus() != SendStatus.SEND_OK) { if (this .defaultMQProducer.isRetryAnotherBrokerWhenNotStoreOK()) { continue ; } } return sendResult; default : break ; } } catch (RemotingException e) { endTimestamp = System.currentTimeMillis(); this .updateFaultItem(mq.getBrokerName(), endTimestamp - beginTimestampPrev, true ); log.warn(String.format("sendKernelImpl exception, resend at once, InvokeID: %s, RT: %sms, Broker: %s" , invokeID, endTimestamp - beginTimestampPrev, mq), e); log.warn(msg.toString()); exception = e; continue ; } catch (MQClientException e) { endTimestamp = System.currentTimeMillis(); this .updateFaultItem(mq.getBrokerName(), endTimestamp - beginTimestampPrev, true ); log.warn(String.format("sendKernelImpl exception, resend at once, InvokeID: %s, RT: %sms, Broker: %s" , invokeID, endTimestamp - beginTimestampPrev, mq), e); log.warn(msg.toString()); exception = e; continue ; } catch (MQBrokerException e) { endTimestamp = System.currentTimeMillis(); this .updateFaultItem(mq.getBrokerName(), endTimestamp - beginTimestampPrev, true ); log.warn(String.format("sendKernelImpl exception, resend at once, InvokeID: %s, RT: %sms, Broker: %s" , invokeID, endTimestamp - beginTimestampPrev, mq), e); log.warn(msg.toString()); exception = e; switch (e.getResponseCode()) { case ResponseCode.TOPIC_NOT_EXIST: case ResponseCode.SERVICE_NOT_AVAILABLE: case ResponseCode.SYSTEM_ERROR: case ResponseCode.NO_PERMISSION: case ResponseCode.NO_BUYER_ID: case ResponseCode.NOT_IN_CURRENT_UNIT: continue ; default : if (sendResult != null ) { return sendResult; } throw e; } } catch (InterruptedException e) { endTimestamp = System.currentTimeMillis(); this .updateFaultItem(mq.getBrokerName(), endTimestamp - beginTimestampPrev, false ); log.warn(String.format("sendKernelImpl exception, throw exception, InvokeID: %s, RT: %sms, Broker: %s" , invokeID, endTimestamp - beginTimestampPrev, mq), e); log.warn(msg.toString()); log.warn("sendKernelImpl exception" , e); log.warn(msg.toString()); throw e; } } else { break ; } } if (sendResult != null ) { return sendResult; } String info = String.format("Send [%d] times, still failed, cost [%d]ms, Topic: %s, BrokersSent: %s" , times, System.currentTimeMillis() - beginTimestampFirst, msg.getTopic(), Arrays.toString(brokersSent)); info += FAQUrl.suggestTodo(FAQUrl.SEND_MSG_FAILED); MQClientException mqClientException = new MQClientException (info, exception); if (callTimeout) { throw new RemotingTooMuchRequestException ("sendDefaultImpl call timeout" ); } if (exception instanceof MQBrokerException) { mqClientException.setResponseCode(((MQBrokerException) exception).getResponseCode()); } else if (exception instanceof RemotingConnectException) { mqClientException.setResponseCode(ClientErrorCode.CONNECT_BROKER_EXCEPTION); } else if (exception instanceof RemotingTimeoutException) { mqClientException.setResponseCode(ClientErrorCode.ACCESS_BROKER_TIMEOUT); } else if (exception instanceof MQClientException) { mqClientException.setResponseCode(ClientErrorCode.BROKER_NOT_EXIST_EXCEPTION); } throw mqClientException; } List<String> nsList = this .getmQClientFactory().getMQClientAPIImpl().getNameServerAddressList(); if (null == nsList || nsList.isEmpty()) { throw new MQClientException ( "No name server address, please set it." + FAQUrl.suggestTodo(FAQUrl.NAME_SERVER_ADDR_NOT_EXIST_URL), null ).setResponseCode(ClientErrorCode.NO_NAME_SERVER_EXCEPTION); } throw new MQClientException ("No route info of this topic, " + msg.getTopic() + FAQUrl.suggestTodo(FAQUrl.NO_TOPIC_ROUTE_INFO), null ).setResponseCode(ClientErrorCode.NOT_FOUND_TOPIC_EXCEPTION); }
由于这个方法逻辑比较多,接下来我们分拆成几个部分来分析。
验证消息 第一步,消息发送之前,首先确保生产者处于运行状态,这里调了 this.makeSureStateOK(),然后便是验证消息 Validators.checkMessage(msg, this.defaultMQProducer) ,点进去org.apache.rocketmq.client.Validators.checkMessage(Message, DefaultMQProducer) 会看到是验证消息是否符合相应的规范,包括具体的规范要求包括:Topic名称,消息体不能为空,消息长度不能等于0且默认不能超过允许发送消息的最大长度4M(maxMessageSize = 1024 * 1024 * 4)。
1
2
3
4
5
6
7
8
9
10
11
12
13
14
15
16
17
18
19
20
21
22
public static void checkMessage (Message msg, DefaultMQProducer defaultMQProducer) throws MQClientException { if (null == msg) { throw new MQClientException (ResponseCode.MESSAGE_ILLEGAL, "the message is null" ); } Validators.checkTopic(msg.getTopic()); if (null == msg.getBody()) { throw new MQClientException (ResponseCode.MESSAGE_ILLEGAL, "the message body is null" ); } if (0 == msg.getBody().length) { throw new MQClientException (ResponseCode.MESSAGE_ILLEGAL, "the message body length is zero" ); } if (msg.getBody().length > defaultMQProducer.getMaxMessageSize()) { throw new MQClientException (ResponseCode.MESSAGE_ILLEGAL, "the message body size over max value, MAX: " + defaultMQProducer.getMaxMessageSize()); } }
查找路由 第二步,查找Topic对应的路由信息(留意方法体的代码注释)。
org.apache.rocketmq.client.impl.producer.DefaultMQProducerImpl.tryToFindTopicPublishInfo(String)
1
2
3
4
5
6
7
8
9
10
11
12
13
14
15
16
17
private TopicPublishInfo tryToFindTopicPublishInfo (final String topic) { TopicPublishInfo topicPublishInfo = this .topicPublishInfoTable.get(topic); if (null == topicPublishInfo || !topicPublishInfo.ok()) { this .topicPublishInfoTable.putIfAbsent(topic, new TopicPublishInfo ()); this .mQClientFactory.updateTopicRouteInfoFromNameServer(topic); topicPublishInfo = this .topicPublishInfoTable.get(topic); } if (topicPublishInfo.isHaveTopicRouterInfo() || topicPublishInfo.ok()) { return topicPublishInfo; } else { this .mQClientFactory.updateTopicRouteInfoFromNameServer(topic, true , this .defaultMQProducer); topicPublishInfo = this .topicPublishInfoTable.get(topic); return topicPublishInfo; } }
这里有点吊诡的是,为什么在前面从NameSrv查不到路由信息,第二次就再来查一次,难道再试一次就能查到吗?带着疑问,跟进去org.apache.rocketmq.client.impl.factory.MQClientInstance.updateTopicRouteInfoFromNameServer(String, boolean, DefaultMQProducer) 方法体里边一探究竟
1
2
3
4
5
6
7
8
9
10
11
12
13
14
15
16
17
18
19
20
21
public boolean updateTopicRouteInfoFromNameServer (final String topic, boolean isDefault, DefaultMQProducer defaultMQProducer) { try { if (this .lockNamesrv.tryLock(LOCK_TIMEOUT_MILLIS, TimeUnit.MILLISECONDS)) { try { TopicRouteData topicRouteData; if (isDefault && defaultMQProducer != null ) { topicRouteData = this .mQClientAPIImpl.getDefaultTopicRouteInfoFromNameServer(defaultMQProducer.getCreateTopicKey(), 1000 * 3 ); if (topicRouteData != null ) { for (QueueData data : topicRouteData.getQueueDatas()) { int queueNums = Math.min(defaultMQProducer.getDefaultTopicQueueNums(), data.getReadQueueNums()); data.setReadQueueNums(queueNums); data.setWriteQueueNums(queueNums); } } } else { topicRouteData = this .mQClientAPIImpl.getTopicRouteInfoFromNameServer(topic, 1000 * 3 ); } ... }
这次调用 updateTopicRouteInfoFromNameServer(…) ,传入的 isDefault 参数为 true,也就是说,会走 if 分支,这里是调 this.mQClientAPIImpl.getDefaultTopicRouteInfoFromNameServer(defaultMQProducer.getCreateTopicKey(), 1000 * 3) 从NameSrv查询Topic路由,不过这回不是查询消息所属的Topic路由信息,而是查询RocketMQ设置的一个默认Topic的路由,进去 defaultMQProducer.getCreateTopicKey() 看到 这个默认的 Topic 是 TBW102 (AUTO_CREATE_TOPIC_KEY_TOPIC = “TBW102”),这个Topic就是用来创建其他Topic所用的。如果某Broker配置了 autoCreateTopicEnable,允许自动创建Topic,那么在该Broker启动后,便会向自己的路由表中插入 TBW102 这个Topic,并注册到NameSrv,表明处理该Topic类型的消息。 如果默认Topic下查询到路由信息,则替换路由信息中读写队列个数为消息生产者默认的队列个数(defaultTopicQueueNums )。如果isDefault 为false ,则使用参数topic 去查询;如果未查询到路由信息,则返回false ,表示路由信息未变化。
1
2
3
4
5
6
7
8
9
10
11
12
13
... if (topicRouteData != null ) { TopicRouteData old = this .topicRouteTable.get(topic); boolean changed = topicRouteDataIsChange(old, topicRouteData); if (!changed) { changed = this .isNeedUpdateTopicRouteInfo(topic); } else { log.info("the topic[{}] route info changed, old[{}] ,new[{}]" , topic, old, topicRouteData); } ... } ...
然后,更新MQClientInstance Broker地址缓存(路由信息转化为PublishInfo)以及更新该MQClientInstance所管辖的所有消息发送关于该topic的路由信息(路由信息转化为MessageQueue列表,此具体实现在 topicRouteData2TopicSubscribeInfo(…) 方法,再根据MessageQueue列表进行更新)。
1 2 3 4 5 6 7 8 9 10 11 12 13 14 15 16 17 18 19 20 21 22 23 24 25 26 { TopicPublishInfo publishInfo = topicRouteData2TopicPublishInfo(topic, topicRouteData); publishInfo.setHaveTopicRouterInfo(true ); Iterator<Entry<String, MQProducerInner>> it = this .producerTable.entrySet().iterator(); while (it.hasNext()) { Entry<String, MQProducerInner> entry = it.next(); MQProducerInner impl = entry.getValue(); if (impl != null ) { impl.updateTopicPublishInfo(topic, publishInfo); } } } { Set<MessageQueue> subscribeInfo = topicRouteData2TopicSubscribeInfo(topic, topicRouteData); Iterator<Entry<String, MQConsumerInner>> it = this .consumerTable.entrySet().iterator(); while (it.hasNext()) { Entry<String, MQConsumerInner> entry = it.next(); MQConsumerInner impl = entry.getValue(); if (impl != null ) { impl.updateTopicSubscribeInfo(topic, subscribeInfo); } } }
org.apache.rocketmq.client.impl.factory.MQClientInstance.topicRouteData2TopicSubscribeInfo(String, TopicRouteData)
1 2 3 4 5 6 7 8 9 10 11 12 13 14 15 16 17 18 19 public static Set<MessageQueue> topicRouteData2TopicSubscribeInfo (final String topic, final TopicRouteData route) { Set<MessageQueue> mqList = new HashSet <MessageQueue>(); List<QueueData> qds = route.getQueueDatas(); for (QueueData qd : qds) { if (PermName.isReadable(qd.getPerm())) { for (int i = 0 ; i < qd.getReadQueueNums(); i++) { MessageQueue mq = new MessageQueue (topic, qd.getBrokerName(), i); mqList.add(mq); } } } return mqList; }
所以,当消息所属的Topic,假设叫Topic X吧,它本身没有在任何Broker上配置的时候,生产者就会查询默认Topic TBW102 的路由信息,暂时作为Topic X的的路由,并插入到本地路由表中。当TopicX利用该路由发送到 Broker后,Broker发现自己并没有该Topic信息后,便会创建好该Topic,并更新到NameSrv中,表明后续接收TopicX的消息。
整理一下获取Topic路由的步骤:TBW102 向NameSrv发起查询,返回TBW102 的路由信息,暂时作为Topic的路由。
查找路由的过程解析到此,接下来是选择消息队列的过程。
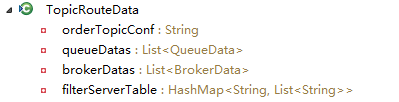
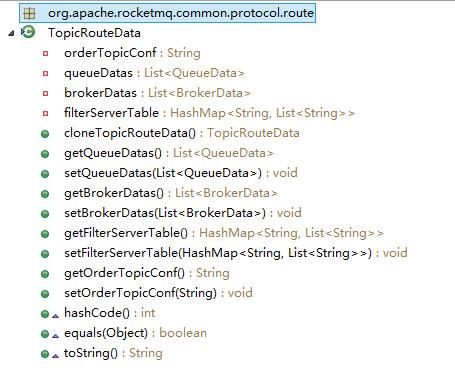
发送消息队列 我们此处所谓发送消息,其实是发送到Queue里的,RocketMQ里边的Queue是个抽象的概念,并不是我们所理解的数据结构里的队列Queue,上文已经提到,每个Topic的路由信息(topicRouteData)中可能包含若干Queue,而topicRouteData是由元数据管理中心NameSrv返回的。也就是说,Producer是从NameSrv拉取的路由信息为TopicRouteData,我们不妨先来看下它的属性:
queueDatas 中包含了Topic对应的所有Queue信息,QueueData的结构如下:
选择队列 接下来,回到 sendDefaultImpl() 方法,看一下拿到路由信息后的下一步,选择队列的过程实现,其中选择队列的逻辑加上了 超时机制 和 重试机制 。当选择某个Queue发送消息失败后,只要还没超时,且没有超出最大重试次数,就是再次尝试选择某个Queue进行重试。
看回 org.apache.rocketmq.client.impl.producer.DefaultMQProducerImpl.sendDefaultImpl(Message, CommunicationMode, SendCallback, long) 方法
1 2 3 4 5 6 7 8 9 10 11 12 13 14 15 16 17 18 19 20 21 22 23 24 25 26 27 28 29 30 31 32 33 34 35 36 37 38 39 40 41 for (; times < timesTotal; times++) { String lastBrokerName = null == mq ? null : mq.getBrokerName(); MessageQueue mqSelected = this .selectOneMessageQueue(topicPublishInfo, lastBrokerName); if (mqSelected != null ) { mq = mqSelected; brokersSent[times] = mq.getBrokerName(); try { beginTimestampPrev = System.currentTimeMillis(); if (times > 0 ) { msg.setTopic(this .defaultMQProducer.withNamespace(msg.getTopic())); } long costTime = beginTimestampPrev - beginTimestampFirst; if (timeout < costTime) { callTimeout = true ; break ; } sendResult = this .sendKernelImpl(msg, mq, communicationMode, sendCallback, topicPublishInfo, timeout - costTime); endTimestamp = System.currentTimeMillis(); this .updateFaultItem(mq.getBrokerName(), endTimestamp - beginTimestampPrev, false ); switch (communicationMode) { case ASYNC: return null ; case ONEWAY: return null ; case SYNC: if (sendResult.getSendStatus() != SendStatus.SEND_OK) { if (this .defaultMQProducer.isRetryAnotherBrokerWhenNotStoreOK()) { continue ; } } return sendResult; default : break ; } } ...
1
2
3
4
5
6
7
8
9
10
11
12
13
14
15
16
17
18
19
20
21
22
23
24
25
26
27
28
29
30
31
32
33
34
35
36
public MessageQueue selectOneMessageQueue (final TopicPublishInfo tpInfo, final String lastBrokerName) { if (this .sendLatencyFaultEnable) { try { int index = tpInfo.getSendWhichQueue().getAndIncrement(); for (int i = 0 ; i < tpInfo.getMessageQueueList().size(); i++) { int pos = Math.abs(index++) % tpInfo.getMessageQueueList().size(); if (pos < 0 ) pos = 0 ; MessageQueue mq = tpInfo.getMessageQueueList().get(pos); if (latencyFaultTolerance.isAvailable(mq.getBrokerName())) { if (null == lastBrokerName || mq.getBrokerName().equals(lastBrokerName)) return mq; } } final String notBestBroker = latencyFaultTolerance.pickOneAtLeast(); int writeQueueNums = tpInfo.getQueueIdByBroker(notBestBroker); if (writeQueueNums > 0 ) { final MessageQueue mq = tpInfo.selectOneMessageQueue(); if (notBestBroker != null ) { mq.setBrokerName(notBestBroker); mq.setQueueId(tpInfo.getSendWhichQueue().getAndIncrement() % writeQueueNums); } return mq; } else { latencyFaultTolerance.remove(notBestBroker); } } catch (Exception e) { log.error("Error occurred when selecting message queue" , e); } return tpInfo.selectOneMessageQueue(); } return tpInfo.selectOneMessageQueue(lastBrokerName); }
由上面代码可知,选择Queue的具体逻辑在topicPublishInfo.selectOneMessageQueue(lastBrokerName)中。这里在调用时传入了lastBrokerName,目前我们还不知道是为了什么,所以带着疑惑进入方法内部看看吧。
1
2
3
4
5
6
7
8
9
10
11
12
13
14
15
16
17
18
19
20
21
22
23
24
25
public MessageQueue selectOneMessageQueue (final String lastBrokerName) { if (lastBrokerName == null ) { return selectOneMessageQueue(); } else { int index = this .sendWhichQueue.getAndIncrement(); for (int i = 0 ; i < this .messageQueueList.size(); i++) { int pos = Math.abs(index++) % this .messageQueueList.size(); if (pos < 0 ) pos = 0 ; MessageQueue mq = this .messageQueueList.get(pos); if (!mq.getBrokerName().equals(lastBrokerName)) { return mq; } } return selectOneMessageQueue(); } } public MessageQueue selectOneMessageQueue () { int index = this .sendWhichQueue.getAndIncrement(); int pos = Math.abs(index) % this .messageQueueList.size(); if (pos < 0 ) pos = 0 ; return this .messageQueueList.get(pos); }
我们来分析一下这段逻辑:
当某条消息第一次发送时,lastBrokerName 为空,此时就是直接取模进行负载均衡操作。但是如果消息发送失败,就会触发重试机制,发送失败有可能是因为Broker出现来某些故障,或者某些网络连通性问题,所以当消息第N次重试时,就要避开第N-1次时消息发往的Broker,也就是lastBrokerName。
发送消息的核心实现 好了,消息发送的核心,就在于最后一步,网络传输了,我们跟踪到 org.apache.rocketmq.client.impl.producer.DefaultMQProducerImpl.sendKernelImpl(Message, MessageQueue, CommunicationMode, SendCallback, TopicPublishInfo, long) 方法里边
1
2
3
4
5
String brokerAddr = this .mQClientFactory.findBrokerAddressInPublish(mq.getBrokerName());if (null == brokerAddr) { tryToFindTopicPublishInfo(mq.getTopic()); brokerAddr = this .mQClientFactory.findBrokerAddressInPublish(mq.getBrokerName()); }
拿到Broker地址后,要将消息内容及其他信息封装进请求头:
1
2
3
4
5
6
7
8
9
10
11
12
13
SendMessageRequestHeader requestHeader = new SendMessageRequestHeader ();requestHeader.setProducerGroup(this .defaultMQProducer.getProducerGroup()); requestHeader.setTopic(msg.getTopic()); requestHeader.setDefaultTopic(this .defaultMQProducer.getCreateTopicKey()); requestHeader.setDefaultTopicQueueNums(this .defaultMQProducer.getDefaultTopicQueueNums()); requestHeader.setQueueId(mq.getQueueId()); requestHeader.setSysFlag(sysFlag); requestHeader.setBornTimestamp(System.currentTimeMillis()); requestHeader.setFlag(msg.getFlag()); requestHeader.setProperties(MessageDecoder.messageProperties2String(msg.getProperties())); requestHeader.setReconsumeTimes(0 ); requestHeader.setUnitMode(this .isUnitMode()); requestHeader.setBatch(msg instanceof MessageBatch);
请求头部封装好之后,接下来重点来看 org.apache.rocketmq.client.impl.MQClientAPIImpl.sendMessage(String, String, Message, SendMessageRequestHeader, long, CommunicationMode, SendCallback, TopicPublishInfo, MQClientInstance, int, SendMessageContext, DefaultMQProducerImpl),这方法内部便是创建网络请求,调用封装的Netty接口进行网络传输了。
首先创建请求:
1
2
3
4
5
6
7
8
9
RemotingCommand request = null ;if (sendSmartMsg || msg instanceof MessageBatch) { SendMessageRequestHeaderV2 requestHeaderV2 = SendMessageRequestHeaderV2.createSendMessageRequestHeaderV2(requestHeader); request = RemotingCommand.createRequestCommand(msg instanceof MessageBatch ? RequestCode.SEND_BATCH_MESSAGE : RequestCode.SEND_MESSAGE_V2, requestHeaderV2); } else { request = RemotingCommand.createRequestCommand(RequestCode.SEND_MESSAGE, requestHeader); } request.setBody(msg.getBody());
这里按照是否发送 smartMsg ,创建了不同请求命令号的请求,接下来,根据消息发送方式(单向、同步、异步),调用不同的发送函数进行网络传输:
1
2
3
4
5
6
7
8
9
10
11
12
13
14
15
16
17
18
19
20
21
22
23
switch (communicationMode) { case ONEWAY: this .remotingClient.invokeOneway(addr, request, timeoutMillis); return null ; case ASYNC: final AtomicInteger times = new AtomicInteger (); long costTimeAsync = System.currentTimeMillis() - beginStartTime; if (timeoutMillis < costTimeAsync) { throw new RemotingTooMuchRequestException ("sendMessage call timeout" ); } this .sendMessageAsync(addr, brokerName, msg, timeoutMillis - costTimeAsync, request, sendCallback, topicPublishInfo, instance, retryTimesWhenSendFailed, times, context, producer); return null ; case SYNC: long costTimeSync = System.currentTimeMillis() - beginStartTime; if (timeoutMillis < costTimeSync) { throw new RemotingTooMuchRequestException ("sendMessage call timeout" ); } return this .sendMessageSync(addr, brokerName, msg, timeoutMillis - costTimeSync, request); default : assert false ; break ; }
至此,消息的发送——从Producer把消息传输到Broker的过程分析就已经结束了。
批量消息发送 批量消息发送是将 同一主题的多条消息一起打包发送到消息服务端,减少网络调用次数,提高网络传输效率。
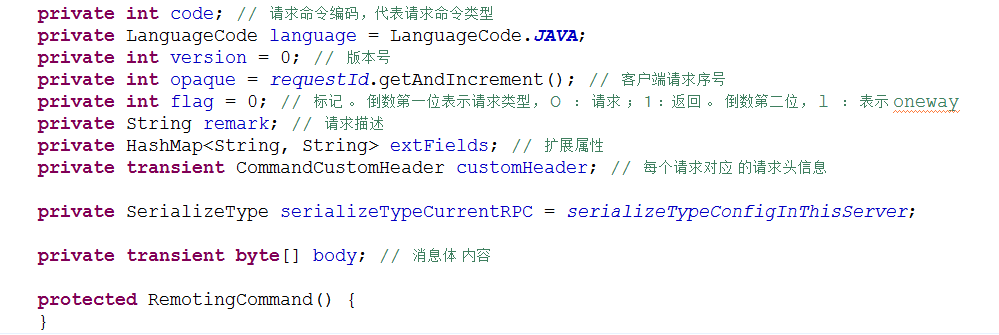
那 RocketMQ 如何编码多条消息呢 ? 我们首先梳理一下 RocketMQ 网络请求命令设计。 其结构如下
单条消息发送时 ,消息体的内容将保存在 body 中 。 批量消息发送 ,需要将多条消息体的内容存储在 body 中,如何存储方便服务端正确解析出 每条消息呢?
接下来梳理一下批量消息发送的核心流程
1
2
3
4
public SendResult send ( Collection<Message> msgs) throws MQClientException, RemotingException, MQBrokerException, InterruptedException { return this .defaultMQProducerImpl.send(batch(msgs)); }
首先在消息发送端,调用 batch 方法 ,将一批消息封装成 MessageBatch 对象。 MessageBatch 继承自 Message 对象,Messag巳Batch 内部持有 List<Message> messages。这样的话,批量消息发送与单条消息发送的处理流程完全一样。MessageBatch 只需要将该集合中的每条消息的消息体 body 聚合成一个 byte[],在消息服务端能够从该 byte[] 中正确解析出消息即可。
1
2
3
public byte [] encode() { return MessageDecoder.encodeMessages(messages); }
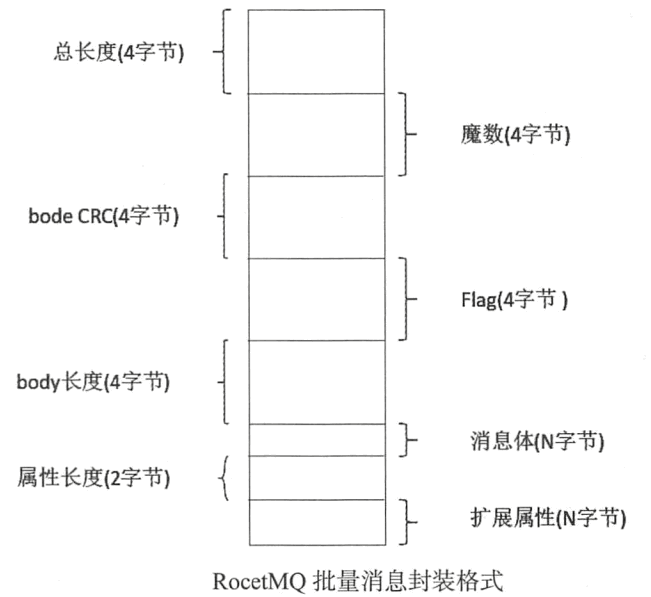
在创建 RemotingCommand 对象时将调用 org.apache.rocketmq.common.message.MessageDecoder.encodeMessage(Message) 方法填充到 RemotingCommand 的 body 域中。多条消息编码方法如下
1
2
3
4
5
6
7
8
9
10
11
12
13
14
15
16
17
18
19
20
21
22
23
24
25
26
27
28
29
30
31
32
33
34
35
36
37
38
39
public static byte [] encodeMessage(Message message) { byte [] body = message.getBody(); int bodyLen = body.length; String properties = messageProperties2String(message.getProperties()); byte [] propertiesBytes = properties.getBytes(CHARSET_UTF8); short propertiesLength = (short ) propertiesBytes.length; int sysFlag = message.getFlag(); int storeSize = 4 + 4 + 4 + 4 + 4 + bodyLen + 2 + propertiesLength; ByteBuffer byteBuffer = ByteBuffer.allocate(storeSize); byteBuffer.putInt(storeSize); byteBuffer.putInt(0 ); byteBuffer.putInt(0 ); int flag = message.getFlag(); byteBuffer.putInt(flag); byteBuffer.putInt(bodyLen); byteBuffer.put(body); byteBuffer.putShort(propertiesLength); byteBuffer.put(propertiesBytes); return byteBuffer.array(); }
在消息发送端将会按照上述结构进行解码,然后整个发送流程与单个消息发送没什么差异。
小结 RocketMQ发送消息重点如下: