PPXu

RocketMQ消息存储

2019-06-02

存储概要设计

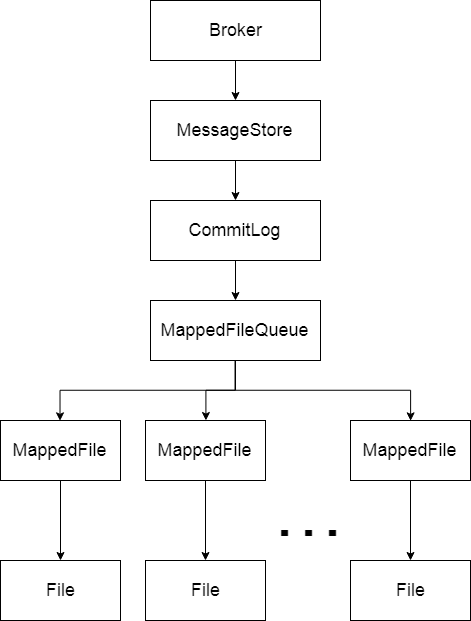
每个Broker都对应有一个MessageStore,专门用来存储发送到它的消息,不过MessageStore本身不是文件,只是存储的一个抽象,MessageStore 中保存着一个 CommitLog,CommitLog 维护了一个 MappedFileQueue,而MappedFileQueue 中又维护了多个 MappedFile,每个MappedFile都会映射到文件系统中一个文件,这些文件才是真正的存储消息的地方,MappedFile的文件名为它记录的第一条消息的全局物理偏移量。

消息接收

Broker对于每个请求 Code,都注册了对应的处理类,其中用于接收消息的处理类为:org.apache.rocketmq.broker.processor.SendMessageProcessor。

1
2
3
this.remotingServer.registerProcessor(RequestCode.SEND_MESSAGE, sendProcessor, this.sendMessageExecutor);
this.remotingServer.registerProcessor(RequestCode.SEND_MESSAGE_V2, sendProcessor, this.sendMessageExecutor);
this.remotingServer.registerProcessor(RequestCode.SEND_BATCH_MESSAGE, sendProcessor, this.sendMessageExecutor);

SendMessageProcessor实现了 org.apache.rocketmq.remoting.netty.NettyRequestProcessor 接口,并在接口方法processRequest()中处理接收到的请求,SendMessageProcessor在processRequest()中调用了sendMessage()方法来进行消息处理。

org.apache.rocketmq.broker.processor.SendMessageProcessor.processRequest(ChannelHandlerContext, RemotingCommand)
1
2
3
4
5
6
7
8
9
10
11
12
13
14
15
16
17
18
19
20
21
22
23
24
25
26
public RemotingCommand processRequest(ChannelHandlerContext ctx,
RemotingCommand request) throws RemotingCommandException {
SendMessageContext mqtraceContext;
switch (request.getCode()) {
case RequestCode.CONSUMER_SEND_MSG_BACK:
return this.consumerSendMsgBack(ctx, request);
default:
SendMessageRequestHeader requestHeader = parseRequestHeader(request);
if (requestHeader == null) {
return null;
}

mqtraceContext = buildMsgContext(ctx, requestHeader);
this.executeSendMessageHookBefore(ctx, request, mqtraceContext);

RemotingCommand response;
if (requestHeader.isBatch()) {
response = this.sendBatchMessage(ctx, request, mqtraceContext, requestHeader);
} else {
response = this.sendMessage(ctx, request, mqtraceContext, requestHeader);
}

this.executeSendMessageHookAfter(response, mqtraceContext);
return response;
}
}

消息存储

SendMessageProcessor-sendMessage()

接收到消息请求后,就要处理请求了,上面调用了sendMessage()来处理消息
SendMessageProcessor 中 sendMessage() 中主要分为下面几步:

  1. 根据收到请求,封装成内部消息结构:MessageExtBrokerInner。

    org.apache.rocketmq.broker.processor.SendMessageProcessor.sendMessage(ChannelHandlerContext, RemotingCommand, SendMessageContext, SendMessageRequestHeader)
    1
    2
    3
    4
    5
    6
    7
    8
    9
    10
    11
    12
    13
    14
    15
    16
    17
    final byte[] body = request.getBody();
    ...

    MessageExtBrokerInner msgInner = new MessageExtBrokerInner();
    msgInner.setTopic(requestHeader.getTopic());
    msgInner.setQueueId(queueIdInt);

    ...

    msgInner.setBody(body);
    msgInner.setFlag(requestHeader.getFlag());
    MessageAccessor.setProperties(msgInner, MessageDecoder.string2messageProperties(requestHeader.getProperties()));
    msgInner.setPropertiesString(requestHeader.getProperties());
    msgInner.setBornTimestamp(requestHeader.getBornTimestamp());
    msgInner.setBornHost(ctx.channel().remoteAddress());
    msgInner.setStoreHost(this.getStoreHost());
    msgInner.setReconsumeTimes(requestHeader.getReconsumeTimes() == null ? 0 : requestHeader.getReconsumeTimes());
  2. 调用 Broker 中 的MessageStore的putMessage() 方法,将消息放入MessageStore中。

    org.apache.rocketmq.broker.processor.SendMessageProcessor.sendMessage(ChannelHandlerContext, RemotingCommand, SendMessageContext, SendMessageRequestHeader)
    1
    putMessageResult = this.brokerController.getMessageStore().putMessage(msgInner);

正如前面所述,每个Broker都有一个MessageStore实例,MessageStore本身是一个接口,定义了一些用来存储消息的接口协议,RocketMQ中MessageStore默认的实现类为DefaultMessageStore,Broker在其初始化方法initialize()中便会初始化好DefaultMessageStore。

DefaultMessageStore-putMessage()

DefaultMessageStore 中 putMessage() 逻辑又分为下面几步:
1). 检查当前Broker是否可以存储消息,比如 MessageStore 被关闭、Broker 状态为 Slave 都会拒绝存储。

org.apache.rocketmq.store.DefaultMessageStore.putMessage(MessageExtBrokerInner)
1
2
3
4
5
6
7
8
9
10
11
12
13
14
15
...
if (this.shutdown) {
log.warn("message store has shutdown, so putMessage is forbidden");
return new PutMessageResult(PutMessageStatus.SERVICE_NOT_AVAILABLE, null);
}

if (BrokerRole.SLAVE == this.messageStoreConfig.getBrokerRole()) {
long value = this.printTimes.getAndIncrement();
if ((value % 50000) == 0) {
log.warn("message store is slave mode, so putMessage is forbidden ");
}

return new PutMessageResult(PutMessageStatus.SERVICE_NOT_AVAILABLE, null);
}
...

2). 检查消息合法性,比如消息的Topic长度和内容长度是否超出限制。这种情况下也会拒绝存储。

org.apache.rocketmq.store.DefaultMessageStore.putMessage(MessageExtBrokerInner)
1
2
3
4
5
6
7
8
9
if (msg.getTopic().length() > Byte.MAX_VALUE) {
log.warn("putMessage message topic length too long " + msg.getTopic().length());
return new PutMessageResult(PutMessageStatus.MESSAGE_ILLEGAL, null);
}

if (msg.getPropertiesString() != null && msg.getPropertiesString().length() > Short.MAX_VALUE) {
log.warn("putMessage message properties length too long " + msg.getPropertiesString().length());
return new PutMessageResult(PutMessageStatus.PROPERTIES_SIZE_EXCEEDED, null);
}

3). 如果消息通过了上面的重重考验,便会被提交给 MessageStore 中的 CommitLog,进行下一步处理。

org.apache.rocketmq.store.DefaultMessageStore.putMessage(MessageExtBrokerInner)
1
PutMessageResult result = this.commitLog.putMessage(msg);

消息到了CommitLog后,便要开始进入存储逻辑了。我们来看看CommitLog中是如何处理消息的。

CommitLog-PutMessage()

  1. 获取写锁,保证同一时刻只处理一条消息的存储操作。

    1
    putMessageLock.lock();
  2. 从CommitLog的Message 中获取最新的MappedFile,追加消息。

    1
    2
    MappedFile mappedFile = this.mappedFileQueue.getLastMappedFile();
    result = mappedFile.appendMessage(msg, this.appendMessageCallback);

前面介绍到,CommitLog 中保存了一个MappedFileQueue,MappedFileQueue 初始化的时候配置了消息文件MappedFile的存储路径以及单个MappedFile文件的大小,当某个消息文件写满后,便会生成一个新的MappedFile继续写入消息,所以MappedFileQueue中会按照消息写入时间顺序,维护多个MappedFile。

  1. 消息追加结束后,释放写锁
    1
    putMessageLock.unlock();

上面这几步中,重点关注的是第2步,即将消息追加到当前最新的MappedFile中。

上面追加消息调用的是MappedFile.appendMessage()方法,此方法最终调用到MappedFile.appendMessagesInner() 中:

org.apache.rocketmq.store.MappedFile.appendMessagesInner(MessageExt, AppendMessageCallback)
1
2
3
4
5
6
7
8
9
10
11
12
13
14
15
16
17
18
19
20
21
22
assert messageExt != null;
assert cb != null;

int currentPos = this.wrotePosition.get();

if (currentPos < this.fileSize) {
ByteBuffer byteBuffer = writeBuffer != null ? writeBuffer.slice() : this.mappedByteBuffer.slice();
byteBuffer.position(currentPos);
AppendMessageResult result = null;
if (messageExt instanceof MessageExtBrokerInner) {
result = cb.doAppend(this.getFileFromOffset(), byteBuffer, this.fileSize - currentPos, (MessageExtBrokerInner) messageExt);
} else if (messageExt instanceof MessageExtBatch) {
result = cb.doAppend(this.getFileFromOffset(), byteBuffer, this.fileSize - currentPos, (MessageExtBatch) messageExt);
} else {
return new AppendMessageResult(AppendMessageStatus.UNKNOWN_ERROR);
}
this.wrotePosition.addAndGet(result.getWroteBytes());
this.storeTimestamp = result.getStoreTimestamp();
return result;
}
log.error("MappedFile.appendMessage return null, wrotePosition: {} fileSize: {}", currentPos, this.fileSize);
return new AppendMessageResult(AppendMessageStatus.UNKNOWN_ERROR);
  1. 获取MappedFile中的 writeBuffer,如果 writeBuffer 为空,则获取mappedByteBuffer。

    在MessageStore初始化的时候,会初始化一个Buffer缓存池:TransientStorePool,TransientStorePool在初始化时会初始化若干DirectBuffer,放入一个Deque中,默认池子容量为5。MappedFile的writeBuffer就是从这个池子中获取的。
    而 mappedByteBuffer 类型为MappedByteBuffer,前面说到每个MappedFile都会映射到文件系统中的一个文件,mappedByteBuffer 即为该文件在内存中的映射。
    当追加消息到MappedFile中,会优先追加到 writeBuffer中。

  2. 调用 cb.doAppend()追加消息,调用该方法时,传入了下面几个参数

    this.getFileFromOffset():MappedFile的全局消息物理偏移量(即MappedFile中第一个消息全局物理偏移量,也是MappedFile的文件名)。
    byteBuffer:即MappedFile的内存缓冲区,也即是 1 中的writeBuffer或mappedByteBuffer。
    this.fileSize - currentPos:fileSize为单个文件的额定大小,默认为1GB,currentPos为当前文件中已经写到什么位置,两个相减即为当前文件剩余容量。
    (MessageExtBrokerInner) messageExt:这个没什么好说的,就是内部封装好的消息

cb 从哪来的呢?前面CommitLog在调用appendMessagesInner()时,传入的 cb 为:this.appendMessageCallback,它的类型为 DefaultAppendMessageCallback,实现了AppendMessageCallback接口。所以我们接下来就要看看DefaultAppendMessageCallback中对于doAppend()的实现即可。

doAppend() 主要逻辑如下:

  1. 计算消息存储的各个属性,如消息长度,消息在消息队列中的长度等。

    1
    2
    3
    4
    5
    6
    7
    8
    9
    10
    11
    12
    13
    14
    15
    16
    String msgId = MessageDecoder.createMessageId(this.msgIdMemory, msgInner.getStoreHostBytes(hostHolder), wroteOffset);

    // Record ConsumeQueue information
    keyBuilder.setLength(0);
    keyBuilder.append(msgInner.getTopic());
    keyBuilder.append('-');
    keyBuilder.append(msgInner.getQueueId());
    String key = keyBuilder.toString();
    Long queueOffset = CommitLog.this.topicQueueTable.get(key);
    ......
    final byte[] topicData = msgInner.getTopic().getBytes(MessageDecoder.CHARSET_UTF8);
    final int topicLength = topicData.length;

    final int bodyLength = msgInner.getBody() == null ? 0 : msgInner.getBody().length;

    final int msgLen = calMsgLength(bodyLength, topicLength, propertiesLength);
  2. 判断消息追加后是否超过单个MappedFile大小,如果超出,则返回状态码:AppendMessageStatus.END_OF_FILE

1
2
3
4
5
6
7
8
9
10
11
12
13
14
// Determines whether there is sufficient free space
if ((msgLen + END_FILE_MIN_BLANK_LENGTH) > maxBlank) {
this.resetByteBuffer(this.msgStoreItemMemory, maxBlank);
// 1 TOTALSIZE
this.msgStoreItemMemory.putInt(maxBlank);
// 2 MAGICCODE
this.msgStoreItemMemory.putInt(CommitLog.BLANK_MAGIC_CODE);
// 3 The remaining space may be any value
// Here the length of the specially set maxBlank
final long beginTimeMills = CommitLog.this.defaultMessageStore.now();
byteBuffer.put(this.msgStoreItemMemory.array(), 0, maxBlank);
return new AppendMessageResult(AppendMessageStatus.END_OF_FILE, wroteOffset, maxBlank, msgId, msgInner.getStoreTimestamp(),
queueOffset, CommitLog.this.defaultMessageStore.now() - beginTimeMills);
}

此时 CommitLog 会新创建一个MappedFile,重新追加消息。

1
2
3
4
5
6
7
8
9
10
11
12
13
14
15
switch (result.getStatus()) {
......
case END_OF_FILE:
unlockMappedFile = mappedFile;
// Create a new file, re-write the message
mappedFile = this.mappedFileQueue.getLastMappedFile(0);
if (null == mappedFile) {
// XXX: warn and notify me
log.error("create mapped file2 error, topic: " + msg.getTopic() + " clientAddr: " + msg.getBornHostString());
beginTimeInLock = 0;
return new PutMessageResult(PutMessageStatus.CREATE_MAPEDFILE_FAILED, result);
}
result = mappedFile.appendMessage(msg, this.appendMessageCallback);
break;
}
  1. 序列化消息内容,存储到内存缓存区中

    1
    2
    3
    4
    5
    6
    7
    8
    9
    10
    11
    12
    13
    14
    15
    16
    17
    18
    19
    20
    21
    22
    23
    24
    25
    26
    27
    28
    29
    30
    31
    32
    33
    34
    35
    36
    37
    38
    39
    40
    41
    42
    43
    44
    45
    46
    47
    48
    // Initialization of storage space
    this.resetByteBuffer(msgStoreItemMemory, msgLen);
    // 1 TOTALSIZE
    this.msgStoreItemMemory.putInt(msgLen);
    // 2 MAGICCODE
    this.msgStoreItemMemory.putInt(CommitLog.MESSAGE_MAGIC_CODE);
    // 3 BODYCRC
    this.msgStoreItemMemory.putInt(msgInner.getBodyCRC());
    // 4 QUEUEID
    this.msgStoreItemMemory.putInt(msgInner.getQueueId());
    // 5 FLAG
    this.msgStoreItemMemory.putInt(msgInner.getFlag());
    // 6 QUEUEOFFSET
    this.msgStoreItemMemory.putLong(queueOffset);
    // 7 PHYSICALOFFSET
    this.msgStoreItemMemory.putLong(fileFromOffset + byteBuffer.position());
    // 8 SYSFLAG
    this.msgStoreItemMemory.putInt(msgInner.getSysFlag());
    // 9 BORNTIMESTAMP
    this.msgStoreItemMemory.putLong(msgInner.getBornTimestamp());
    // 10 BORNHOST
    this.resetByteBuffer(hostHolder, 8);
    this.msgStoreItemMemory.put(msgInner.getBornHostBytes(hostHolder));
    // 11 STORETIMESTAMP
    this.msgStoreItemMemory.putLong(msgInner.getStoreTimestamp());
    // 12 STOREHOSTADDRESS
    this.resetByteBuffer(hostHolder, 8);
    this.msgStoreItemMemory.put(msgInner.getStoreHostBytes(hostHolder));
    //this.msgBatchMemory.put(msgInner.getStoreHostBytes());
    // 13 RECONSUMETIMES
    this.msgStoreItemMemory.putInt(msgInner.getReconsumeTimes());
    // 14 Prepared Transaction Offset
    this.msgStoreItemMemory.putLong(msgInner.getPreparedTransactionOffset());
    // 15 BODY
    this.msgStoreItemMemory.putInt(bodyLength);
    if (bodyLength > 0)
    this.msgStoreItemMemory.put(msgInner.getBody());
    // 16 TOPIC
    this.msgStoreItemMemory.put((byte) topicLength);
    this.msgStoreItemMemory.put(topicData);
    // 17 PROPERTIES
    this.msgStoreItemMemory.putShort((short) propertiesLength);
    if (propertiesLength > 0)
    this.msgStoreItemMemory.put(propertiesData);

    final long beginTimeMills = CommitLog.this.defaultMessageStore.now();
    // Write messages to the queue buffer
    byteBuffer.put(this.msgStoreItemMemory.array(), 0, msgLen);
  2. 返回追加成功的结果

    1
    2
    AppendMessageResult result = new AppendMessageResult(AppendMessageStatus.PUT_OK, wroteOffset, msgLen, msgId,
    msgInner.getStoreTimestamp(), queueOffset, CommitLog.this.defaultMessageStore.now() - beginTimeMills);

文件存储及刷盘策略

RocketMQ支持的刷盘策略有两种:

  1. 同步刷盘
    同步的意思就是说当消息追加到内存后,就立即刷到文件中存储。

  2. 异步刷盘
    当消息追加到内存中,并不是理解刷到文件中,而是在后台任务中进行异步操作。

RocketMQ默认采用异步刷盘策略。

当CommitLog在putMessage()中收到MappedFile成功追加消息到内存的结果后,便会调用handleDiskFlush()方法进行刷盘,将消息存储到文件中。handleDiskFlush() 便会根据两种刷盘策略,调用不同的刷盘服务。

org.apache.rocketmq.store.CommitLog.CommitLog(DefaultMessageStore)
1
2
3
4
5
if (FlushDiskType.SYNC_FLUSH == defaultMessageStore.getMessageStoreConfig().getFlushDiskType()) {
this.flushCommitLogService = new GroupCommitService();
} else {
this.flushCommitLogService = new FlushRealTimeService();
}

同步刷盘

同步刷盘的服务为GroupCommitService,主要逻辑如下:

  1. handleDiskFlush()中提交刷盘请求

    1
    2
    3
    4
    final GroupCommitService service = (GroupCommitService) this.flushCommitLogService;

    GroupCommitRequest request = new GroupCommitRequest(result.getWroteOffset() + result.getWroteBytes());
    service.putRequest(request);
  2. 同步等待刷盘结果,刷盘失败也会标志消息存储失败,返回 FLUSH_DISK_TIMEOUT

    1
    2
    3
    4
    5
    6
    boolean flushOK = request.waitForFlush(this.defaultMessageStore.getMessageStoreConfig().getSyncFlushTimeout());
    if (!flushOK) {
    log.error("do groupcommit, wait for flush failed, topic: " + messageExt.getTopic() + " tags: " + messageExt.getTags()
    + " client address: " + messageExt.getBornHostString());
    putMessageResult.setPutMessageStatus(PutMessageStatus.FLUSH_DISK_TIMEOUT);
    }

进行同步刷盘的服务为 GroupCommitService,当请求被提交给GroupCommitService后,GroupCommitService并不是立即处理,而是先放到内部的一个请求队列中,并利用waitPoint通知新请求到来。

1
2
3
4
5
6
7
8
public synchronized void putRequest(final GroupCommitRequest request) {
synchronized (this.requestsWrite) {
this.requestsWrite.add(request);
}
if (hasNotified.compareAndSet(false, true)) {
waitPoint.countDown(); // notify
}
}

当 GroupCommitService 被唤醒后,便会将 requestsWrite 中的请求交换到 requestsRead中,避免产生锁竞争。

1
2
3
4
5
private void swapRequests() {
List<GroupCommitRequest> tmp = this.requestsWrite;
this.requestsWrite = this.requestsRead;
this.requestsRead = tmp;
}

GroupCommitService 在启动后会在死循环中调用doCommit()方法,而doCommit()则不断遍历requestsRead中的请求,进行处理:

1
2
3
4
5
6
7
8
9
10
11
12
13
14
15
16
17
18
19
20
21
22
23
24
25
26
27
28
29
30
31
private void doCommit() {
synchronized (this.requestsRead) {
if (!this.requestsRead.isEmpty()) {
for (GroupCommitRequest req : this.requestsRead) {
// There may be a message in the next file, so a maximum of
// two times the flush
boolean flushOK = false;
for (int i = 0; i < 2 && !flushOK; i++) {
flushOK = CommitLog.this.mappedFileQueue.getFlushedWhere() >= req.getNextOffset();

if (!flushOK) {
CommitLog.this.mappedFileQueue.flush(0);
}
}

req.wakeupCustomer(flushOK);
}

long storeTimestamp = CommitLog.this.mappedFileQueue.getStoreTimestamp();
if (storeTimestamp > 0) {
CommitLog.this.defaultMessageStore.getStoreCheckpoint().setPhysicMsgTimestamp(storeTimestamp);
}

this.requestsRead.clear();
} else {
// Because of individual messages is set to not sync flush, it
// will come to this process
CommitLog.this.mappedFileQueue.flush(0);
}
}
}

可见这里最终调用了CommitLog.this.mappedFileQueue.flush(0) 来进行刷盘。

同步刷盘的任务虽然也是在异步线程中执行,但是消息存储的主流程中会同步等待刷盘结果,所以本质上还是同步操作。

异步刷盘

同步刷盘的服务为FlushRealTimeService,不过当内存缓存池TransientStorePool 可用时,消息会先提交到TransientStorePool 中的WriteBuffer内部,再提交到MappedFile的FileChannle中,此时异步刷盘服务就是 CommitRealTimeService,它继承自 FlushRealTimeService。

我们别管那么多,先看看FlushRealTimeService中的主要逻辑吧:

  1. handleDiskFlush()中直接唤醒异步刷盘服务

    1
    flushCommitLogService.wakeup();
  2. FlushRealTimeService 在启动后,会在死循环中周期性的进行刷盘操作,主要逻辑如下。

    1
    2
    3
    4
    5
    6
    7
    8
    9
    10
    11
    12
    13
    14
    15
    16
    17
    18
    19
    20
    21
    22
    23
    24
    25
    26
    27
    28
    29
    30
    31
    32
    33
    34
    35
    36
    37
    38
    39
    40
    41
    42
    43
    44
    45
    46
    47
    48
    49
    50
    51
    52
    53
    while (!this.isStopped()) {
    // 休眠策略,为 true 时,调用 Thread.sleep()休眠,为false时,调用wait()休眠,默认 false
    boolean flushCommitLogTimed = CommitLog.this.defaultMessageStore.getMessageStoreConfig().isFlushCommitLogTimed();

    // 获取刷盘周期,默认为 500 ms
    int interval = CommitLog.this.defaultMessageStore.getMessageStoreConfig().getFlushIntervalCommitLog();
    // 每次刷盘至少要刷多少页内容,每页大小为 4 k,默认每次要刷 4 页
    int flushPhysicQueueLeastPages = CommitLog.this.defaultMessageStore.getMessageStoreConfig().getFlushCommitLogLeastPages();
    // 两次刷写之间的最大时间间隔,默认 10 s
    int flushPhysicQueueThoroughInterval =
    CommitLog.this.defaultMessageStore.getMessageStoreConfig().getFlushCommitLogThoroughInterval();

    boolean printFlushProgress = false;

    // Print flush progress
    long currentTimeMillis = System.currentTimeMillis();
    // 判断当前时间距离上次刷盘时间是否已经超出设置的两次刷盘最大间隔
    if (currentTimeMillis >= (this.lastFlushTimestamp + flushPhysicQueueThoroughInterval)) {
    this.lastFlushTimestamp = currentTimeMillis;
    // 如果已经超时,则将flushPhysicQueueLeastPages设置为0,表明将所有内存缓存全部刷到文件中
    flushPhysicQueueLeastPages = 0;
    printFlushProgress = (printTimes++ % 10) == 0;
    }

    try {
    // 根据不同休眠策略,进行休眠等待
    if (flushCommitLogTimed) {
    Thread.sleep(interval);
    } else {
    this.waitForRunning(interval);
    }

    if (printFlushProgress) {
    this.printFlushProgress();
    }

    long begin = System.currentTimeMillis();

    // 休眠结束,开始执行刷盘操作
    CommitLog.this.mappedFileQueue.flush(flushPhysicQueueLeastPages);
    long storeTimestamp = CommitLog.this.mappedFileQueue.getStoreTimestamp();
    if (storeTimestamp > 0) {
    CommitLog.this.defaultMessageStore.getStoreCheckpoint().setPhysicMsgTimestamp(storeTimestamp);
    }
    long past = System.currentTimeMillis() - begin;
    if (past > 500) {
    log.info("Flush data to disk costs {} ms", past);
    }
    } catch (Throwable e) {
    CommitLog.log.warn(this.getServiceName() + " service has exception. ", e);
    this.printFlushProgress();
    }
    }

通过上面这段逻辑可知,异步刷盘就在异步线程中,周期性的将内存缓冲区的内容刷到文件中,在消息主流程中,只会唤醒异步刷盘线程,而不会同步等待刷盘结果,所以称为异步刷盘。

MappedFile的刷盘

两种刷盘策略,最终都调用了下面这个方法进行刷盘

1
CommitLog.this.mappedFileQueue.flush(flushPhysicQueueLeastPages);

是时候看看mappedFileQueue.flush()中做了什么了。

  1. 从mappedFileQueue保存的所有MappedFile中,找出所要刷盘的MappedFile
1
MappedFile mappedFile = this.findMappedFileByOffset(this.flushedWhere, this.flushedWhere == 0);

flushedWhere 记录了最后一条被刷到文件的内容的全局物理偏移量。所以此次刷盘就要根据偏移量,找到本次要刷盘的起始点位于哪个MappedFile。

  1. 如果找到了对应的MappedFile,则对该MappedFile中的内容执行刷盘操作,并更新flushedWhere。
1
2
3
4
5
6
7
8
9
10
if (mappedFile != null) {
long tmpTimeStamp = mappedFile.getStoreTimestamp();
int offset = mappedFile.flush(flushLeastPages);
long where = mappedFile.getFileFromOffset() + offset;
result = where == this.flushedWhere;
this.flushedWhere = where;
if (0 == flushLeastPages) {
this.storeTimestamp = tmpTimeStamp;
}
}

刷盘的终极目的地就在MappedFile的flush()方法中,具体也分为下面几步:

  1. 判断是否满足刷盘条件
    1
    if (this.isAbleToFlush(flushLeastPages)) 
    isAbleToFlush()其实就是判断当前剩余未刷盘内容长度,是否超过最小刷盘长度:flushLeastPages,避免不必要的刷盘操作。
1
2
3
4
5
6
7
8
9
10
11
12
13
14
private boolean isAbleToFlush(final int flushLeastPages) {
int flush = this.flushedPosition.get();
int write = getReadPosition();

if (this.isFull()) {
return true;
}

if (flushLeastPages > 0) {
return ((write / OS_PAGE_SIZE) - (flush / OS_PAGE_SIZE)) >= flushLeastPages;
}

return write > flush;
}
  1. 如果满足刷盘条件,则将内存中的内容刷到文件中。
    1
    2
    3
    4
    5
    6
    7
    // 如果writeBuffer不为空,则表明消息是先提交到writeBuffer中,已经从writeBuffer提交到fileChannel,直接调用fileChannel.force()
    if (writeBuffer != null || this.fileChannel.position() != 0) {
    this.fileChannel.force(false);
    } else {
    // 反之,消息是直接存储在文件内存映射缓冲区mappedByteBuffer中,直接调用它的force()即可
    this.mappedByteBuffer.force();
    }

到这儿,消息就成功的从内存中存储到文件内部了。

消息索引

ConsumerQueue

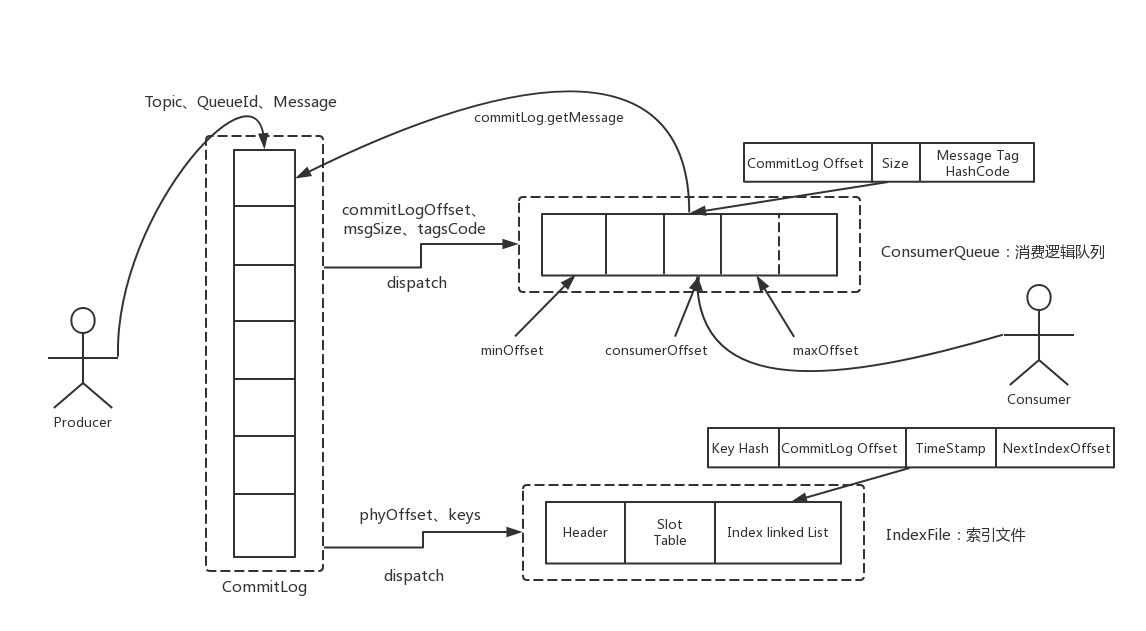
RocketMQ为了保证消息发送的高吞吐量,采用单一文件存储(CommitLog)所有Topic的消息,从而保证消息存储是完全的顺序写,这是写消息的高性能所在,但是这样给文件读取带来了不便,试想一下如果消费者直接从CommitLog中去遍历查找所订阅的Topic下的消息,效率将极其低下。为了适应消息消费的检索需求,RocketMQ设计了消息消费队列文件(ConsumeQueue),ConsumeQueue可以看成是CommitLog关于消息消费的“索引”文件,ConsumeQueue的第一级目录为Topic,第二级目录为Topic底下的消息队列(MessageQueue)。

为了加速 ConsumeQueue 消息条目的检索速度与节省磁盘空间,每一个 ConsumeQueue 条目不会存储消息的全量信息,它存储自己所属Topic的消息在CommitLog中的偏移量,这样当消费者从Broker拉取消息的时候,就可以快速根据偏移量定位到消息,其存储格式如图所示

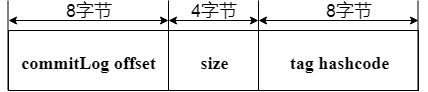
单个 ConsumeQueue 文件默认包含30万个条目,也就是说单个文件的长度为30W x 20 字节。单个ConsumeQueue文件可以看作是一个 ConsumeQueue 条目的数组,数组下标为 ConsumeQueue 的逻辑偏移量,消息消费进度存储的偏移量即逻辑偏移量。

ConsumeQueue 构建机制是当消息到达 Commitlog 文件后 由专门的线程产生消息转发任务,从而构建消息消费队列文件与下文提到的索引文件。

ConsumeQueue本身同样是利用MappedFileQueue进行记录偏移量信息的,可见MappedFileQueue的设计多么美妙,它没有与消息进行耦合,而是设计成一个通用的存储功能。

先来看一下ConsumeQueue根据消息逻辑偏移量、时间戳查找消息的实现。

根据消息逻辑偏移量查找消息

org.apache.rocketmq.store.ConsumeQueue.getIndexBuffer(long)
1
2
3
4
5
6
7
8
9
10
11
12
public SelectMappedBufferResult getIndexBuffer(final long startIndex) {
int mappedFileSize = this.mappedFileSize;
long offset = startIndex * CQ_STORE_UNIT_SIZE;
if (offset >= this.getMinLogicOffset()) {
MappedFile mappedFile = this.mappedFileQueue.findMappedFileByOffset(offset);
if (mappedFile != null) {
SelectMappedBufferResult result = mappedFile.selectMappedBuffer((int) (offset % mappedFileSize));
return result;
}
}
return null;
}

根据 startIndex 获取消息消费队列条目。首先 startIndex * 20 算得在 consumeQueue 中的物理偏移 ,如果该 offset 小于 minLogicOffset,则返回 null,说明该消息已被删除;如果大于 minLogicOffset,则根据偏移量定位到具体的物理文件,然后通过 offset 与物理文大小取模获取在该文件的偏移,从而从偏移量开始连续读取 20个字节即可。

根据时间戳查找消息

由于方法代码篇幅较长,以下分段进行解析

org.apache.rocketmq.store.ConsumeQueue.getOffsetInQueueByTime(long)
1
2
3
4
5
6
7
8
9
10
11
12
13
14
public long getOffsetInQueueByTime(final long timestamp) {
MappedFile mappedFile = this.mappedFileQueue.getMappedFileByTime(timestamp);
if (mappedFile != null) {
long offset = 0;
int low = minLogicOffset > mappedFile.getFileFromOffset() ? (int) (minLogicOffset - mappedFile.getFileFromOffset()) : 0;
int high = 0;
int midOffset = -1, targetOffset = -1, leftOffset = -1, rightOffset = -1;
long leftIndexValue = -1L, rightIndexValue = -1L;
long minPhysicOffset = this.defaultMessageStore.getMinPhyOffset();
SelectMappedBufferResult sbr = mappedFile.selectMappedBuffer(0);
if (null != sbr) {
ByteBuffer byteBuffer = sbr.getByteBuffer();
high = byteBuffer.limit() - CQ_STORE_UNIT_SIZE;
...

首先根据时间戳定位到物理文件,其具体实现就是从首个文件开始找,直到找到首次出现更新时间大于该时间戳的文件。

org.apache.rocketmq.store.ConsumeQueue.getOffsetInQueueByTime(long)
1
2
3
4
5
6
7
8
9
10
11
12
13
14
15
16
17
18
19
20
21
22
23
24
25
26
27
28
29
30
31
...
try {
while (high >= low) {
midOffset = (low + high) / (2 * CQ_STORE_UNIT_SIZE) * CQ_STORE_UNIT_SIZE;
byteBuffer.position(midOffset);
long phyOffset = byteBuffer.getLong();
int size = byteBuffer.getInt();
if (phyOffset < minPhysicOffset) {
low = midOffset + CQ_STORE_UNIT_SIZE;
leftOffset = midOffset;
continue;
}

long storeTime =
this.defaultMessageStore.getCommitLog().pickupStoreTimestamp(phyOffset, size);
if (storeTime < 0) {
return 0;
} else if (storeTime == timestamp) {
targetOffset = midOffset;
break;
} else if (storeTime > timestamp) {
high = midOffset - CQ_STORE_UNIT_SIZE;
rightOffset = midOffset;
rightIndexValue = storeTime;
} else {
low = midOffset + CQ_STORE_UNIT_SIZE;
leftOffset = midOffset;
leftIndexValue = storeTime;
}
}
...

采用二分查找来加速检索。首先计算最低查找偏移量,取消息队列最小偏移量该文件最小偏移量二者中的较小者作为low,获得当前存储文件中有效的最小消息物理偏移量minPhysicOffset,如果查找到消息偏移量小于该物理偏移量,则结束该查找过程。
二分查找的常规退出循环的条件为( low > high ),首先查找中间的偏移量 midOffset,将 ConsumeQueue 文件对应的 ByteBuffer 定位到 midOffset ,然后读取4个字节获取该消息的物理偏移量 offset。

  1. 如果得到的物理偏移量小于当前的最小物理偏移量,说明待查找的物理偏移量肯定大于 midOffset,所以将 low 设置为 midOffset ,然后继续折半查找;
  2. 如果 offset 大于最小物理偏移,说明该消息是有效消息,则根据消息偏移量和消息长度获取消息的存储时间戳;
  3. 如果存储时间小于0,消息为无效消息,直接返回0;
  4. 如果存储时间戳等于待查找时间戳,说明查找到匹配消息,设置 targetOffset 并跳出循环;
  5. 如果存储时间戳大于待查找时间戳,说明待查找信息小于 midOffset ,则设置 high 为 midOffset 并设置 rightlndexValue 等于 midOffset;
  6. 如果存储时间小于待查找时间戳,说明待查找消息在大于 midOffset ,则设置 low 为 midOffset ,并设置 leftIndexValue 等于 midOffset。
org.apache.rocketmq.store.ConsumeQueue.getOffsetInQueueByTime(long)
1
2
3
4
5
6
7
8
9
10
11
12
13
14
15
16
17
18
19
20
21
22
23
24
25
                if (targetOffset != -1) {

offset = targetOffset;
} else {
if (leftIndexValue == -1) {

offset = rightOffset;
} else if (rightIndexValue == -1) {

offset = leftOffset;
} else {
offset =
Math.abs(timestamp - leftIndexValue) > Math.abs(timestamp
- rightIndexValue) ? rightOffset : leftOffset;
}
}

return (mappedFile.getFileFromOffset() + offset) / CQ_STORE_UNIT_SIZE;
} finally {
sbr.release();
}
}
}
return 0;
}

如果 targetOffset 不等于-1,表示找到了存储时间戳等于待查找时间的消息;如果 leftIndexValue 等于-1,表示返回比当前时间戳大并且最接近待查找时间的偏移量;如果 rightIndexValue 等于-1,表示返回的消息比待查找时间戳小并且最接近查找的偏移量。

索引文件

因为ConsumeQueue中没有存储消息ID,如果我们需要根据消息ID来查找消息,那么,在不采取其它措施来查找消息的情况下,就又得遍历CommitLog文件了,于是,为了满足这个需求,RocketMQ采用了索引文件(IndexFile)。

RocketMQ引入了Hash索引机制为消息建立索引,HashMap的设计,包含两个基本点:Hash槽与解决Hash冲突的链表结构。IndexFile布局如图

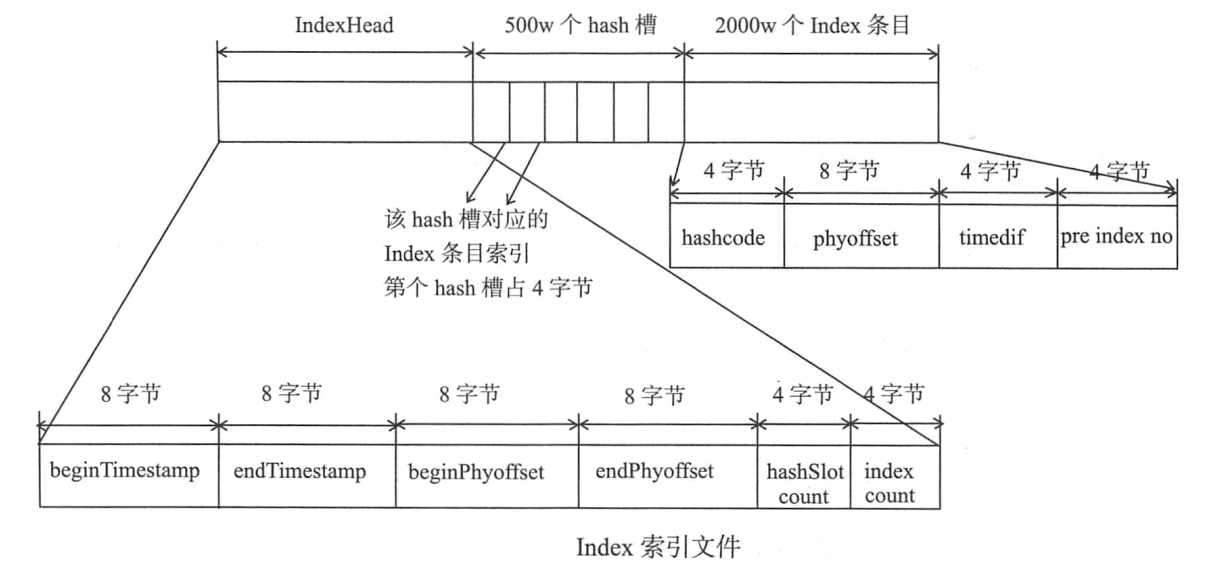
消息的索引信息是存放在磁盘上的,文件以时间戳命名的,默认存放在 $ROCKETMQ_HOME/store/index 目录下。由上图来看,一个索引文件的结构被分成了三部分:

  • 前 40 个字节存放固定的索引头(IndexHeader)信息,包含了存放在这个索引文件中的消息的最小/大存储时间最小/大偏移量等状况
  • 中间一段存储了 500 万个哈希槽位,每个槽内部存储的是索引文件的地址 (索引槽)
  • 最后一段存储了 2000 万个索引内容信息,是实际的索引信息存储的地方。每一个槽位存储了这条消息的键哈希值、存储偏移量、存储时间戳与下一个索引槽地址

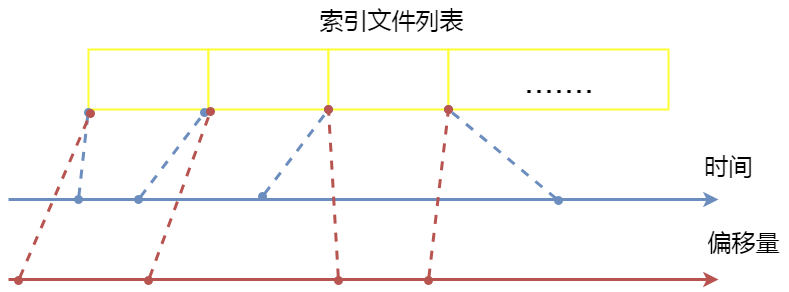
事实上,RocketMQ 在内存中还维护了一个索引文件列表,对于每一个索引文件,前一个文件的最大存储时间是下一个文件的最小存储时间,前一个文件的最大偏移量是下一个文件的最小偏移量。每一个索引文件都索引了在某个时间段内、某个偏移量段内的所有消息,当文件满了,就会用前一个文件的最大偏移量和最大存储时间作为起始值,创建下一个索引文件:

IndexFile文件的数据写入

org.apache.rocketmq.store.index.IndexFile.putKey(String, long, long)
1
2
3
4
5
6
7
8
9
10
11
12
13
14
15
16
17
18
19
20
21
22
23
24
25
26
27
28
29
30
31
32
33
34
35
36
37
38
39
40
41
42
43
44
45
46
47
48
49
50
51
52
53
54
55
56
57
58
59
60
61
62
63
64
65
66
67
68
69
70
71
72
73
74
75
76
77
78
79
80
81
82
83
84
85
86
87
88
89
90
91
92
93
94
95
96
/**
*
* @param key topic + uniqKey
* @param phyOffset 物理偏移量
* @param storeTimestamp
* @return
*/
public boolean putKey(final String key, final long phyOffset, final long storeTimestamp) {
//1、判断index是否已满,返回失败
if (this.indexHeader.getIndexCount() < this.indexNum) {
//2、计算key的非负数hashCode
int keyHash = indexKeyHashMethod(key);
//3、key应该存放的slot keyHash % 500W
int slotPos = keyHash % this.hashSlotNum;
//3、slot的数据存放位置 40 + keyHash %(500W)* 4
int absSlotPos = IndexHeader.INDEX_HEADER_SIZE + slotPos * hashSlotSize;

FileLock fileLock = null;

try {

// fileLock = this.fileChannel.lock(absSlotPos, hashSlotSize,
// false);
//5、如果存在hash冲突,获取这个slot存的前一个index的计数,如果没有则值为0
int slotValue = this.mappedByteBuffer.getInt(absSlotPos);
if (slotValue <= invalidIndex || slotValue > this.indexHeader.getIndexCount()) {
slotValue = invalidIndex;
}

//6、计算当前msg的存储时间和第一条msg相差秒数
long timeDiff = storeTimestamp - this.indexHeader.getBeginTimestamp();

//这里为了节约空间;直接timestamp是8位
timeDiff = timeDiff / 1000;

if (this.indexHeader.getBeginTimestamp() <= 0) {
timeDiff = 0;
} else if (timeDiff > Integer.MAX_VALUE) {
timeDiff = Integer.MAX_VALUE;
} else if (timeDiff < 0) {
timeDiff = 0;
}

//7、获取该条index实际存储position
//40 + 500W * 4 + index的顺序数 * 40;
int absIndexPos =
IndexHeader.INDEX_HEADER_SIZE + this.hashSlotNum * hashSlotSize
+ this.indexHeader.getIndexCount() * indexSize;

//8、Index Linked list
//topic+message key的hash值
this.mappedByteBuffer.putInt(absIndexPos, keyHash);
//消息在CommitLog的物理文件地址, 可以直接查询到该消息(索引的核心机制)
this.mappedByteBuffer.putLong(absIndexPos + 4, phyOffset);
//消息的落盘时间与header里的beginTimestamp的差值(为了节省存储空间,如果直接存message的落盘时间就得8bytes)
this.mappedByteBuffer.putInt(absIndexPos + 4 + 8, (int) timeDiff);
//9、记录该slot上一个index
//hash冲突处理的关键之处, 相同hash值上一个消息索引的index(如果当前消息索引是该hash值的第一个索引,则prevIndex=0, 也是消息索引查找时的停止条件),每个slot位置的第一个消息的prevIndex就是0的
this.mappedByteBuffer.putInt(absIndexPos + 4 + 8 + 4, slotValue);

//Slot Table
//4字节
//10、记录该slot当前index,如果hash冲突(即absSlotPos一致)作为下一次该slot新增的前置index
this.mappedByteBuffer.putInt(absSlotPos, this.indexHeader.getIndexCount());

//11、如果是第一条消息,更新header中的起始offset和起始time
if (this.indexHeader.getIndexCount() <= 1) {
this.indexHeader.setBeginPhyOffset(phyOffset);
this.indexHeader.setBeginTimestamp(storeTimestamp);
}

//12、累计indexHeader
this.indexHeader.incHashSlotCount();
this.indexHeader.incIndexCount();
this.indexHeader.setEndPhyOffset(phyOffset);
this.indexHeader.setEndTimestamp(storeTimestamp);

return true;
} catch (Exception e) {
log.error("putKey exception, Key: " + key + " KeyHashCode: " + key.hashCode(), e);
} finally {
if (fileLock != null) {
try {
fileLock.release();
} catch (IOException e) {
log.error("Failed to release the lock", e);
}
}
}
} else {
log.warn("Over index file capacity: index count = " + this.indexHeader.getIndexCount()
+ "; index max num = " + this.indexNum);
}

return false;
}

其中,第5步判断slot的值是否存在,如存在则hash冲突,则在第9步把value设置为当前index的前一个index,到第10步将slot的值设置为当前index,这里有点类似HashMap的链表操作。值得注意的一点是,IndexFile 条目中存储的不
是消息索引 key 而是消息属性 key 的 HashCode ,在 根据 key 查找时需要根据消息物理偏移量找到消息进而再验证消息 key 的值,之所以只存储 Hash Code 而不存储具体的 key 是为了将 Index 目设计为定长结构,才 能方便地检索 与定位条目。

索引文件检索

索引生成的key是topic#MessageKey,所以两者作为参数传递进去查询消息

org.apache.rocketmq.store.index.IndexService.queryOffset(String, String, int, long, long)
1
2
3
4
5
6
7
8
9
10
11
12
13
14
15
16
17
18
19
20
21
22
23
24
25
26
27
28
29
30
31
32
33
34
35
36
37
38
39
40
41
42
43
44
45
46
47
48
49
50
51
/**
*
* @param topic 按topic维度来查询消息,因为索引生成的时候key是用的topic#MessageKey
* @param key MessageKey
* @param maxNum 最多返回的消息数,因为key是由用户设置的,并不保证唯一,所以可能取到多个消息;同时index中只存储了hash,所以hash相同的消息也会取出来
* @param begin 起始时间
* @param end 结束时间
* @return
*/
public QueryOffsetResult queryOffset(String topic, String key, int maxNum, long begin, long end) {
List<Long> phyOffsets = new ArrayList<Long>(maxNum);

long indexLastUpdateTimestamp = 0;
long indexLastUpdatePhyoffset = 0;
//不会超过64条
maxNum = Math.min(maxNum, this.defaultMessageStore.getMessageStoreConfig().getMaxMsgsNumBatch());
try {
this.readWriteLock.readLock().lock();
if (!this.indexFileList.isEmpty()) {
//1、从最后一个文件开始往前查找,最后一个文件是最新的
for (int i = this.indexFileList.size(); i > 0; i--) {
IndexFile f = this.indexFileList.get(i - 1);
boolean lastFile = i == this.indexFileList.size();
if (lastFile) {
indexLastUpdateTimestamp = f.getEndTimestamp();
indexLastUpdatePhyoffset = f.getEndPhyOffset();
}

//2、判断index文件的时间包含了begin和end的全部或者部分
if (f.isTimeMatched(begin, end)) {
//3、从index文件中获取offset
f.selectPhyOffset(phyOffsets, buildKey(topic, key), maxNum, begin, end, lastFile);
}

if (f.getBeginTimestamp() < begin) {
break;
}

if (phyOffsets.size() >= maxNum) {
break;
}
}
}
} catch (Exception e) {
log.error("queryMsg exception", e);
} finally {
this.readWriteLock.readLock().unlock();
}

return new QueryOffsetResult(phyOffsets, indexLastUpdateTimestamp, indexLastUpdatePhyoffset);
}

物理偏移量查找

org.apache.rocketmq.store.index.IndexFile.selectPhyOffset(List, String, int, long, long, boolean)
1
2
3
4
5
6
7
8
9
10
11
12
13
14
15
16
17
18
19
20
21
22
23
24
25
26
27
28
29
30
31
32
33
34
35
36
37
38
39
40
41
42
43
44
45
46
47
48
49
50
51
52
53
54
55
56
57
58
59
60
61
62
63
64
65
66
67
68
69
70
71
72
73
74
75
76
77
78
79
80
81
82
83
84
85
86
public void selectPhyOffset(final List<Long> phyOffsets, final String key, final int maxNum,
final long begin, final long end, boolean lock) {
if (this.mappedFile.hold()) {
//1、计算key的非负数hashCode
int keyHash = indexKeyHashMethod(key);
//2、key应该存放的slot keyHash % 500W
int slotPos = keyHash % this.hashSlotNum;
//3、slot的数据存放位置 40 + keyHash %(500W)* 4
int absSlotPos = IndexHeader.INDEX_HEADER_SIZE + slotPos * hashSlotSize;

FileLock fileLock = null;
try {
if (lock) {
// fileLock = this.fileChannel.lock(absSlotPos,
// hashSlotSize, true);
}

//4、获取slot最后存储的index位置进行回溯
int slotValue = this.mappedByteBuffer.getInt(absSlotPos);
// if (fileLock != null) {
// fileLock.release();
// fileLock = null;
// }

if (slotValue <= invalidIndex || slotValue > this.indexHeader.getIndexCount()
|| this.indexHeader.getIndexCount() <= 1) {
} else {
for (int nextIndexToRead = slotValue; ; ) {
//5、查询条目满足则返回
if (phyOffsets.size() >= maxNum) {
break;
}

//6、获取该条index实际存储position
int absIndexPos =
IndexHeader.INDEX_HEADER_SIZE + this.hashSlotNum * hashSlotSize
+ nextIndexToRead * indexSize;

int keyHashRead = this.mappedByteBuffer.getInt(absIndexPos);
//7、物理偏移量即commitLog的offset
long phyOffsetRead = this.mappedByteBuffer.getLong(absIndexPos + 4);

//当前msg的存储时间和第一条msg相差秒数
long timeDiff = (long) this.mappedByteBuffer.getInt(absIndexPos + 4 + 8);
int prevIndexRead = this.mappedByteBuffer.getInt(absIndexPos + 4 + 8 + 4);

if (timeDiff < 0) {
break;
}

timeDiff *= 1000L;

long timeRead = this.indexHeader.getBeginTimestamp() + timeDiff;
boolean timeMatched = (timeRead >= begin) && (timeRead <= end);

//8、hash一致并且时间在begin和end之间,加入结果集中
if (keyHash == keyHashRead && timeMatched) {
phyOffsets.add(phyOffsetRead);
}

//9、读取到0,说明没数据可读
if (prevIndexRead <= invalidIndex
|| prevIndexRead > this.indexHeader.getIndexCount()
|| prevIndexRead == nextIndexToRead || timeRead < begin) {
break;
}

//10、前一条不等于0,继续读取前一条,往前回溯
nextIndexToRead = prevIndexRead;
}
}
} catch (Exception e) {
log.error("selectPhyOffset exception ", e);
} finally {
if (fileLock != null) {
try {
fileLock.release();
} catch (IOException e) {
log.error("Failed to release the lock", e);
}
}

this.mappedFile.release();
}
}
}

实时更新消息消费队列和索引文件

消息消费队列文件(ConsumeQueue)和消息属性索引文件(IndexFile)都是基于CommitLog文件构建的,当Producer提交消息存储到CommitLog文件中,consumeQueue和IndexFile需要及时更新,保证消息消费的及时性。而RocketMQ是通过开启一个线程ReputMessageService来做到准实时转发CommitLog文件更新的事件请求,而监听事件变化的相应的任务处理器根据转发的消息及时更新ConsumeQueue与IndexFile。更新流程如下:

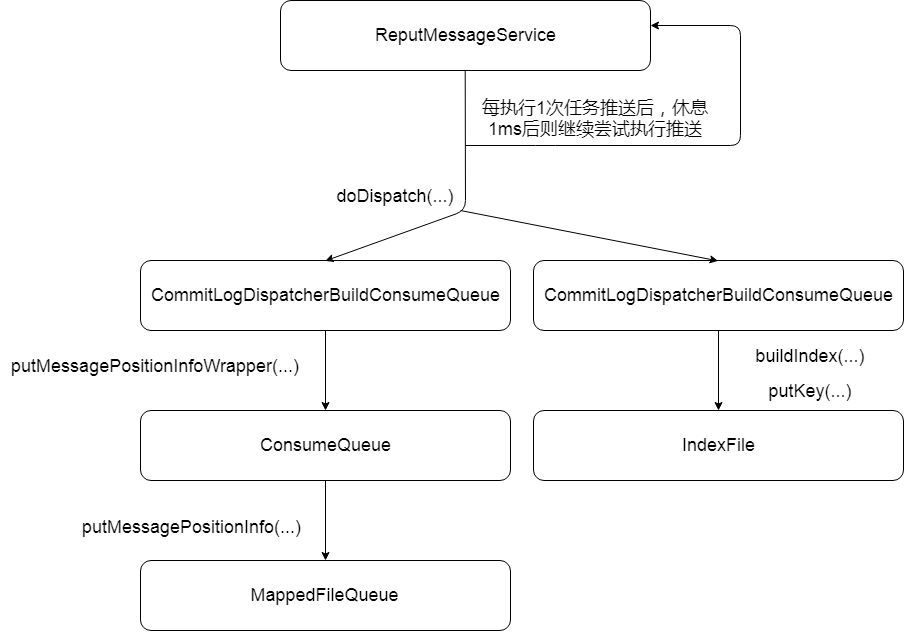
由org.apache.rocketmq.store.DefaultMessageStore.start()得知,每个Broker在启动时,会启动ReputMessageService线程,并初始化一个非常关键的参数reputFromOffset。该参数的含义是ReputMessageService从哪个物理偏移量开始转发消息给ConsumeQueue和IndexFile。如果允许重复转发,reputFromOffset设置为CommitLog的提交指针;如果不允许重复转发,reputFromOffset设置为CommitLog在内存中的最大偏移量。

org.apache.rocketmq.store.DefaultMessageStore.start()
1
2
this.reputMessageService.setReputFromOffset(maxPhysicalPosInLogicQueue);
this.reputMessageService.start();

如上图所示,ReputMessageService线程每执行1次任务推送后,休眠1ms即继续尝试推送更新任务到ConsumeQueue及IndexFile,任务转发的核心实现在doReput(…)方法中实现,其主要逻辑主要如下:

  1. 返回reputFromOffset偏移量开始的全部有效数据(commitlog 文件),然后循环读取每一条消息。
  2. 从SelectMappedBufferResult返回的ByteBuffer中循环读取消息,一次读取一条,创建DispatchRequest对象,如果消息长度大于0,则调用doDispatch方法,最终分别调用CommitLogDispatcherBuildConsumeQueue(构建消息消费队列)、CommitLogDispatcherBuildlndex(构建索引文件)。接下来看下这两者的具体实现。

根据消息更新ConsumeQueue

ConsumeQueue转发任务实现类为 CommitLogDispatcherBuildConsumeQueue,内部终将调用 putMessagePositionInfo(DispatchRequest) 方法

org.apache.rocketmq.store.DefaultMessageStore.putMessagePositionInfo(DispatchRequest)
1
2
3
4
public void putMessagePositionInfo(DispatchRequest dispatchRequest) {
ConsumeQueue cq = this.findConsumeQueue(dispatchRequest.getTopic(), dispatchRequest.getQueueId());
cq.putMessagePositionInfoWrapper(dispatchRequest);
}

根据Topic及队列ID,先获取对应的ConsumeQueue文件,其逻辑比较简单,因为每个Topic对应一个ConsumeQueue目录,然后Topic下每个消息队列对应一个文件夹,然后Topic下每个消息队列对应一个文件夹,然后取出该文件夹最后的ConsumeQueue文件即可。

1
2
3
4
5
6
7
8
9
10
11
12
13
this.byteBufferIndex.flip();
this.byteBufferIndex.limit(CQ_STORE_UNIT_SIZE);
this.byteBufferIndex.putLong(offset);
this.byteBufferIndex.putInt(size);
this.byteBufferIndex.putLong(tagsCode);

final long expectLogicOffset = cqOffset * CQ_STORE_UNIT_SIZE;

MappedFile mappedFile = this.mappedFileQueue.getLastMappedFile(expectLogicOffset);
if (mappedFile != null) {
...
return mappedFile.appendMessage(this.byteBufferIndex.array());
}

依次将消息偏移量、消息长度、 tag_hashcode 写入到 ByteBuffer 中,并根据consumeQueueOffset计算ConsumeQueue中的物理地址,将内容追加到ConsumeQueue的内存映射文件(MappedFile,但本操作只追加并不刷盘),ConsumeQueue的刷盘方式固定为异步刷盘模式。

根据消息更新IndexFile

Hash 索引文件转发任务实现类为 CommitLogDispatcherBuildIndex

org.apache.rocketmq.store.DefaultMessageStore.CommitLogDispatcherBuildIndex.dispatch(DispatchRequest)
1
2
3
4
5
public void dispatch(DispatchRequest request) {
if (DefaultMessageStore.this.messageStoreConfig.isMessageIndexEnable()) {
DefaultMessageStore.this.indexService.buildIndex(request);
}
}

由以上代码可知,支持由配置方式,透过设置messageIndexEnable为true,来决定是否调用重建索引服务,也就是IndexService.buildIndex方法。

org.apache.rocketmq.store.index.IndexService.buildIndex(DispatchRequest)
1
2
3
4
5
6
7
8
9
10
IndexFile indexFile = retryGetAndCreateIndexFile();
if (indexFile != null) {
long endPhyOffset = indexFile.getEndPhyOffset();
DispatchRequest msg = req;
String topic = msg.getTopic();
String keys = msg.getKeys();
if (msg.getCommitLogOffset() < endPhyOffset) {
return;
}
...

获取或创建 IndexFile 文件并获取所有文件最大的物理偏移量 如果该消息的物理偏移量小于索引文件中的物理偏移,则说明是重复数据,忽略本次索引构建。

org.apache.rocketmq.store.index.IndexService.buildIndex(DispatchRequest)
1
2
3
4
5
6
7
if (req.getUniqKey() != null) {
indexFile = putKey(indexFile, msg, buildKey(topic, req.getUniqKey()));
if (indexFile == null) {
log.error("putKey error commitlog {} uniqkey {}", req.getCommitLogOffset(), req.getUniqKey());
return;
}
}

如果消息的唯一键不为空,则添加到 Hash 索引中,以便加速根据唯一键检索消息。

org.apache.rocketmq.store.index.IndexService.buildIndex(DispatchRequest)
1
2
3
4
5
6
7
8
9
10
11
12
13
if (keys != null && keys.length() > 0) {
String[] keyset = keys.split(MessageConst.KEY_SEPARATOR);
for (int i = 0; i < keyset.length; i++) {
String key = keyset[i];
if (key.length() > 0) {
indexFile = putKey(indexFile, msg, buildKey(topic, key));
if (indexFile == null) {
log.error("putKey error commitlog {} uniqkey {}", req.getCommitLogOffset(), req.getUniqKey());
return;
}
}
}
}

构建索引键, RocketMQ 支持为同一个消息建立多个索引,多个索引键空格分开。

小结

RocketMQ 主要存储文件包含消息文件(Commitlog)、消息消费队列文件(ConsumeQueue)、 Hash 索引文件 (IndexFile )等。单个消息存储文件、消息消费队列文件、Hash索引文件长度固定以便使用内存映射机制进行文件的读写操作。RocketMQ 组织文件以文件的起始偏移量来命名文件,这样根据偏移量能快速定位到真实的物理文件。RocketMQ基于内存映射文件机制提供了同步刷盘与异步刷盘两种机制,异步刷盘是指在消息存储时先追加到内存映射文件,然后启动专门的刷盘线程定时将内存中的数据刷写到磁盘。当消息到达 Commitlog 文件后,会通过 ReputMessageService线程接近实时地将消息转发给消息消费队列文件与索引文件。


大神总结的RocketMQ消息存储的总体架构图如下:

RocketMQ采用的这种存储结构,我们可以理解成混合型存储结构,即为Broker单个实例下所有的队列共用一个日志数据文件(即为CommitLog)来存储。而Kafka采用的是独立型的存储结构,每个队列一个文件。这种混合型结构的缺点在于,随机读的操作较多,降低读消息的效率,于是RocketMQ使用ConsumeQueue文件及IndexFile文件辅助消息读取、查找,而这样也要付出一定的开销及维护代价。为此,RocketMQ为提高读写性能,把系统中所有I/O请求,都通过Page Cache机制实现,Page Cache本身可以对数据文件进行预读取。
另外,RocketMQ主要通过MappedByteBuffer对文件进行读写操作。其中,利用了NIO中的FileChannel模型直接将磁盘上的物理文件直接映射到用户态的内存地址中(这种Mmap的方式减少了传统IO将磁盘文件数据在操作系统内核地址空间的缓冲区和用户应用程序地址空间的缓冲区之间来回进行拷贝的性能开销),将对文件的操作转化为直接对内存地址进行操作,从而极大地提高了文件的读写效率(这里需要注意的是,采用MappedByteBuffer这种内存映射的方式有几个限制,其中之一是一次只能映射1.5~2G 的文件至用户态的虚拟内存,这也是为何RocketMQ默认设置单个CommitLog日志数据文件为1G的原因了)。

最后,附上大神总结的RocketMQ文件存储模型结构图:
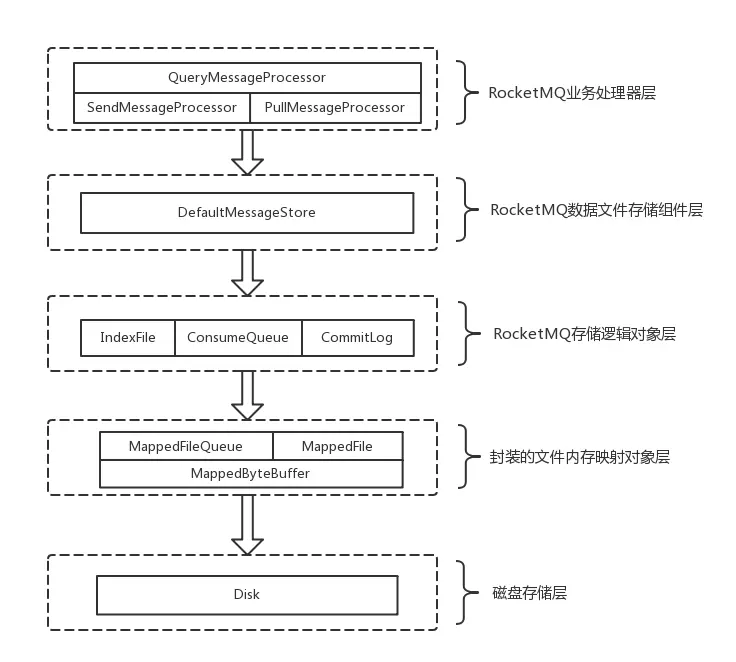
Reference

《RocketMQ技术内幕》丁威
RocketMQ源码分析之ConsumeQueue
消息中间件—RocketMQ消息存储(一)

扫描二维码,分享此文章